Abstract
Occlusal diagnosis plays an important role in the planning and subsequent delivery of predictable functional and aesthetic restorations and prostheses. Once an occlusal problem is identified there are a number of techniques and materials that can be utilised to record occlusal relationships, subsequently analyse them and incorporate information obtained into the delivery of tooth restoration or replacement. This paper discusses the clinical and technical aspects of occlusal examination and analysis outlining contemporary and traditional techniques in their utilisation. Aspects of occlusal examination will be revisited; the identification and recording of centric occlusion as well as subsequent articulation will be discussed. The requirement for occlusal splint provision will also be discussed and illustrated.
Keywords
Occlusal examination ; Centric occlusion ; Articulation ; Occlusal splint
Introduction
In the first paper of this two part series a variety of occlusal issues that a general dental practitioner would commonly encounter in clinical practice were discussed [1] . The incorrect diagnosis of an occlusal condition and subsequent mismanagement may impact clinical outcome in terms of affecting the prognosis of the existing dentition and restorations whilst restricting general occlusal function which are not beneficial for the patient. It is the intention of these papers to guide the clinician to be able to implement a broad diagnostic strategy for occlusal management that can be applied in general practice. The following account will provide the clinician with a systematic method of approaching the examination and diagnosis of common occlusal issues within restorative dentistry and prosthodontics as described in Part I.
Occlusal examination
A thorough medical, dental and social history of the patient and a pain questionnaire should be completed before the examination of the patient is undertaken. The occlusal examination will be utilised to not only inspect the intra-oral tooth to tooth relationships, but also to take note of the extra-oral position of how the mandible relates to the maxilla without the influence of the dentition. Not all patients require a full comprehensive occlusal examination and it is the opinion of the authors that the depth and extent of occlusal examination and investigation undertaken for any patient should stay relevant to the specific occlusal complaints of the clinical situation.
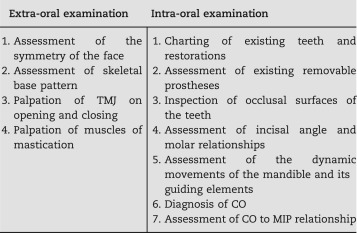
A comprehensive occlusal examination should start with an extra-oral examination including an assessment of symmetry; the muscles of mastication and the skeletal base pattern. The extra-oral examination can then develop further to the inspection and palpation of the temporomandibular joint and associated orofacial musculature. The palpation techniques of the elevator and depressor muscles of mastication are beyond the remit of this article, however can be found described in other relevant texts [2] .
The details of intra-oral occlusal examination should commence from as basic as possible and be in respect to what is deemed appropriate by the existing requirements for the patient in order to manage their presenting occlusal condition. The examination of a new patient at the initial consultation will require at least an inspection of the occlusal surfaces of the teeth, a recording of the incisal angle and molar relationships, and the nature of the tooth related mandibular guidance in both protrusive and lateral excursive movements. These observations can be identified and documented. An occlusal examination that is more exhaustive will include the diagnosis of centric occlusion (CO) which can be made by manipulating the patient׳s mandible using chin point guidance, but more favourably by a bimanual mandibular manipulation technique as described by Dawson [3] . If it proves challenging to carry this out due to resistance by the patient, the use of a Lucia jig as an adjunct for this purpose is favoured by the authors. A Lucia jig is a removable custom made anterior flat plane bite platform deprogrammer first published by Lucia in 1964. It works by breaking the natural neuroceptive engram of the patient׳s habitual closure into maximal intercuspal position (MIP) [4] . It can be made of a variety of materials, commonly acrylic resin is used (e.g. Trim, Bosworth Company, U.S.A).
CO to MIP relationship
The CO to MIP relationship maybe easier to diagnose in some patients than others due to the ability to manipulate the patient׳s mandible into the hinge axis position. The difficulty may be exacerbated by the existing level of parafunction and occlusal disharmony present. The diagnosis of CO may not be possible at the initial appointment and therefore it may be prudent to construct a removable occlusal appliance to allow a period of neuromuscular deprogramming before the diagnostic occlusal examination can be carried out at a later date. Occlusal appliances for this use could include a Lucia jig as a short term measure, or for a longer term period a removable occlusal splint may be used [4] and [5] .
The diagnosis of CO is made when the mandible is manipulated into the hinge axis and the arch of rotation of the mandible occurs without anterior translation of the condyles occurring, this will take place as the condyles are seated and braced in their most superior anterior position within the glenoid fossa. As the mandible is closed towards the maxilla the identification of the first point of tooth contact can be confirmed by the patient as to which side it occurs, and the exact tooth to tooth contact can be marked using occlusal indicating paper. The majority of patients (approximately 90%) may demonstrate a discrepancy between the CO and habitual MIP [6] , where MIP may lie anterior and superior to the CO by approximately 1.25±1 mm [7] . The exact descriptive nature of the CO to MIP centric slide is not needed at this stage, but can be clinically assessed and a record of which can be detailed by means of clinical photographs or completion of an occlusal chart diagram, and confirmed later on a set of articulated diagnostic study casts. The use of GHM occlusal indicating paper (Hanel-GMHDental GMBH, Nurtingen, Germany) of different colours (black and red) and Shimstock bite foil (Hanel-GMHDental GMBH, Nurtingen, Germany) handled using Miller forceps and Artery forceps respectively, may be used to record this discrepancy.
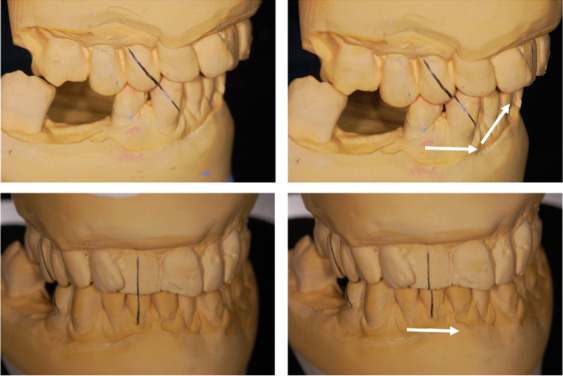
The centric slide if present may exhibit three directional components, vertical (superior/inferior) and horizontal (anterior/posterior and medial/lateral). These components will vary in their degree and an attempt must be made to identify which is the most dominant component if adjustments are made to the CO. This relationship may be fully assessed and confirmed on a set of articulated study casts so that effects to mandibular movement are investigated which may have an impact upon the anatomical occlusal design of both posterior and anterior restorations.
For patients where the CO to MIP relationship has been diagnosed as being the identical, one may assume that either this has not been diagnosed correctly or the centric slide may have been obliterated by means of tooth surface loss related to parafuction and bruxism.
Impressions and diagnostic study casts
Alginate impressions can be taken in metal rimlock impression trays, alternatively silicone impressions may be taken in plastic stock impression trays. Vacuum mixed gypsum is then used to pour the impressions for the fabrication of diagnostic study casts. The benefit of using a silicone material is that it allows the impressions to be poured again to make a duplicate set of casts without the need of agar or silicone duplication of the original set of diagnostic study casts.
Cast articulation and verification
It is necessary that accurate verified diagnostic study casts are mounted on an articulator in order to allow the clinician to closely duplicate the dynamic movements of the mandible outside of the clinical environment. An Arcon semi-adjustable articulator (e.g. Denar Mark II, Whip Mix Corporation, U.S.A) maybe used. Within this articulation arrangement the condylar elements are located on the lower member of the articulator which more closely represents the anatomical form of the temporomandibular joint (TMJ). The use of the semi-adjustable articulator allows the clinician to adjust the sagittal condylar inclination, progressive side shift (Bennet angle) and immediate side shift settings from average values which are pre-programmed at 27°, 7° and 0 mm respectively. Changes can be made to the settings of the articulator by obtaining bite records made in protrusive movements and lateral excursions; this can be of particular use when designing the shape and anatomical form of posterior restorations.
Before mounting the diagnostic study casts to the articulator, the casts should be verified for their accuracy to ensure that the production process from impression taking to cast pouring has not introduced any dimensional errors to their shape. The first part of the verification process of both the maxillary and mandibular casts involves an initial visual assessment to confirm that no gross distortions have occurred.
A facebow record can then be taken and transferred to the articulator to mount the maxillary cast to the upper member of the articulator. Brown impression compound (Kerr, U.S.A) or a rigid silicone bite registration material (e.g. Blu Mousse, Parkell Inc., U.S.A) may be used as bite fork recording materials. The resultant cusp indentations produced in the recording material should be trimmed with a scalpel blade to expose shallow recordings of the cusp tip indentations. Verification of cast accuracy may be made by matching the cusp indentations of the teeth made in the bite fork recording material to the corresponding cusp tips of the diagnostic study cast. The casts being introduced to the cusp indentations should seat positively verifying their dimensional accuracy to the intra-oral recordings. If discrepancies are noted, a new impression should be made for production of a new diagnostic cast which again will need to be verified for its accuracy in the same manner. Cast verification minimises discrepancies in diagnostic accuracy that may magnify through the diagnostic phase.
A separate bitefork may be used to record the cusp positions in the mandible for verification of the mandibular cast.
Centric relation record
Centric relation (CR) allows the mandible to position in the retruded arc of closure with the condyles acting in a purely rotational movement independent of tooth contact. A ‘tooth apart’ CR record captures this position and permits location of the mandibular cast to the maxillary cast whilst mounting to the lower member of the articulator. This procedure can be aided by means of a Luica jig for deprogramming the habitual closure of the patient into MIP and also act as an anterior vertical stop for the mandibular incisors [3] , [8] and [9] .
The CR record can be made of a rigid double thickness of Moyco beauty wax (Moyco Industries, U.S.A) acting as a carrier for a low viscosity bite registration material in order to record the cusps of the opposing arches at the vertical height set by the anterior Lucia jig stop. A variety of bite registration materials can be used so long as when the CR is recorded, the registration material exhibits a low viscous fluid consistency, then allowed to completely polymerise to a rigid state and remain dimensionally stable over a period of time and easily adjusted with a scalpel blade [10] and [11] . A high value of Shore Hardness (scale ‘D’) of the polymerised bite registration material is preferred. The rigidity and resistance to deformation is also augmented by the hard Moyco beauty wax carrier. Examples of bite registration materials that can be used are TempBond (Kerr, U.S.A), Zinc oxide eugenol impression paste (Bosworth Company, U.S.A) or a silicone bite registration paste (e.g. Blu Mousse, Parkell Inc., U.S.A). Multiple CR records may be taken at this stage but are only useful for comparison to one another for accuracy if used in conjunction with a verification instrument.
Once the CR records have been recorded, the lower cast may now be located to the upper cast and mounted to the lower member of the articulator. It should be noted that both the maxillary and mandibular casts can also be verified at this stage using the CR record as an alternative to facebow bite fork impressions.
Verification of cast mounting
Before the tooth relationships of the casts are fully examined on the articulator, the positional mountings of the maxillary and mandibular casts must also be verified.
Verification of the cast mounting maybe carried out by use of an instrument such as the Denar Vericheck or its successor the Denar Centricheck (Whip Mix Corporation, USA). The recording of multiple (three or five) CR records will allow the clinician to compare the individual records to each other and allow the mounting of what is deemed to be the correct maxillary and mandibular positional relationship in CR. The mandibular cast must be mounted as soon as possible after the registration is taken, as the centric relation record still may be susceptible to deformation due to adverse temperature changes or by mechanical stresses from transportation. It is common practice of the authors to mount the mandibular cast themselves after the CR record is taken.
Articulated study cast examination
Examination of the articulated casts should begin with correlating the occlusal findings detected clinically to what has been noted from inspection of the mounted casts. The occlusal markings on the articulated casts can be verified using occlusal charts or clinical photographs. Records of Shimstock holding tooth pairs can also be used and checked against the mounted casts. Shimstock bite foil is considered the thinnest for checking occlusal holding contacts; its thickness is 8 µm whereas commonly used occlusal marking papers can have a broad range of 18–70 µm thickness. It is important that the clinician is aware of the different thicknesses of occlusion indicating paper so that communication with technicians remain consistent.
If the diagnostic findings of the mounted casts do not correlate to intra-oral findings, the clinician must assume that the efforts to accurately record CR and mount the casts have been imprecise. The clinician must then go back to the patient to check the original occlusal findings and re-register the CR record for a remount of the mandibular cast.
The CO to MIP centric slide assessment can now be made by drawing a continuous pencil line between opposing maxillary and mandibular contacting teeth and viewing their relationship to each other after the centric slide has occurred.
Occlusal splints
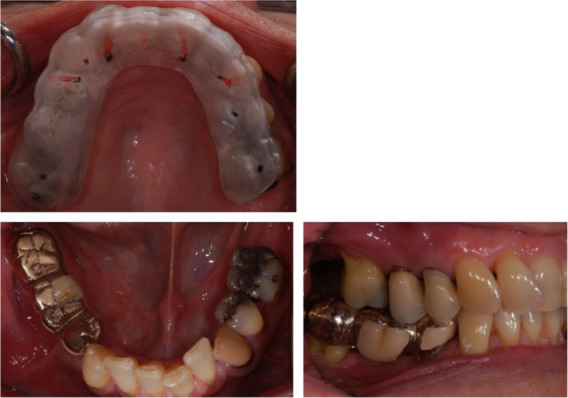
The Glossary of Prosthodontic Terms defines an Occlusal Splint (Occlusal Device) as ‘any removable artificial occlusal surface used for diagnosis or therapy affecting the relationship of the mandible to the maxilla. It may be used for occlusal stabilisation, for treatment of temporomandibular disorders or to prevent wear of the dentition’ [12] .
In general a hard acrylic full coverage maxillary splint may be used for a variety of clinical scenarios. The Michigan splint type design was first described by Ramfjord and Ash and is suitable for use in Class 1 and Class 2 patients [5] . In Class 3 patients the splint maybe made for the mandibular cover where it is referred as a Tanner splint. The Michigan type design prescription maybe indicated for a range of occlusal issues. The benefit of full occlusal coverage is that it does not allow the differential movement and migration of teeth that would be unopposed over a long period of time, thereby reducing the risk of iatrogenic tooth movement and occlusal instability. This type of occlusal splint is favoured by the authors as a protective measure for the prevention of further tooth surface loss (TSL) and further damage to teeth by parafuctional activity. It also may be used as a pre-treatment diagnostic aid for the recording of CR by acting as a muscle deprogrammer [5] .
The design of the splint is paramount to its success and acceptability to the patient. It should allow the complete uninhibited movement of the mandible against its surface without being restricted in any motion. The optimal occlusal design of the splint should be a flat contacting surface allowing point contact of the opposing mandibular teeth. The number of contacting centric stops should correlate to the number of mandibular teeth. The anterior ramp should allow a path of shallow to steep guidance that is adequate enough to allow minimal disclusion of the posterior teeth against the surface of the splint on protrusive movements and lateral excursions of the mandible. This should be checked on both working and non-working sides.
Adjustments using the flat horizontal plane of an acrylic bud trimming bur can be used ensuring that no indentations are introduced to the contacting surface of the splint. If it is felt that the thickness of the splint is going to be compromised then it may be checked with thickness callipers. The ideal thickness of the splint should be at least 2 mm at the closest point of contact in the CR. The increase of thickness or relining localised areas may be made at a later stage after the splint has been processed by way of cold cure acrylic addition e.g. Simplex Rapid (Kemdent, Witlshire, U.K).
The occlusal markings on the splint may be highlighted by roughening the occlusal contacting surface by 50 µm alumina blasting. The other surfaces of the splint can be highly polished to allow added comfort to the patient.
Difficulties lie where the existing occlusal plane is severely altered by differential eruption and compensatory eruption of teeth whereby the occlusal plane in particular the curve of Spee is very uneven. This may prove technically challenging in the waxing and eventual production of an optimal occlusal design of the splint.
Planning restorations
Not all restorations that are planned may be designed to conform to the patient׳s existing occlusal scheme especially if there are attempts to reorganise the occlusion whilst providing multiple complex restorations. It was mentioned in the first article that a common treatment modality used in the U.K. is that of the Dahl concept [1] and [13] . This type of management strategy may be used with appropriate occlusal diagnosis and planning so that the design of the intended restorations is made considering an assessment of their aesthetic and functional requirements.
A type of restoration that is often cemented ‘high in occlusion’ is an adhesive resin bonded prosthesis (RBP). This type of restoration relies on enamel bonding for its retention and therefore no preparation to the proposed abutment tooth is made to accommodate for the thickness of the metal wing retainer [14] , [15] and [16] . If the design of the restoration allows, it is advised to provide this conforming to the existing occlusal scheme. However, the RBP restoration if effectively planned on articulated study casts will often allow subsequent occlusal adaptation by the intrusion of opposing teeth and the vertical migration of others, until a stable MIP has been re-established. The period of time of adjustment can vary between 2 and 6 months in the author׳s experience. If after 6 months no obvious occlusal compensation has occurred, one can assume that no further adaptation will occur and there must be an alternative treatment plan for the clinician to revert to for further management. Planned adjustment of the retainer and the opposing tooth can be made. The occurrence of this must always be initially anticipated and is mandatory to the treatment planning process and the patient fully informed of the consequences should intrusion or compensation of occlusion not materialise. The success of the occlusal compensation occurring is very dependent upon how much increase in the OVD that has occurred, the greater the OVD increase the longer the compensation adaptation will take.
When either conforming or reorganising the occlusion, the shape and form of the intended definitive restorations must be diagnostically waxed on the set of mounted study casts. This wax-up will allow the technician to design the aesthetic and functional form of the restorations by following the occlusal prescription determined by the clinician, the design can be checked by the clinician and then shown to the patient before any decisions to carry on with treatment are made.
Case report
The following case report highlights relevant occlusal diagnostic procedures that are discussed in this article. Adherence to systematic clinical and laboratory procedures allowed the clinician to arrive to an accurate occlusal diagnosis for the restoration and conservative management of the dentition when faced with a patient that potentially may have required aggressive occlusal adjustments for occlusal stabilisation to be made pre-restoration.
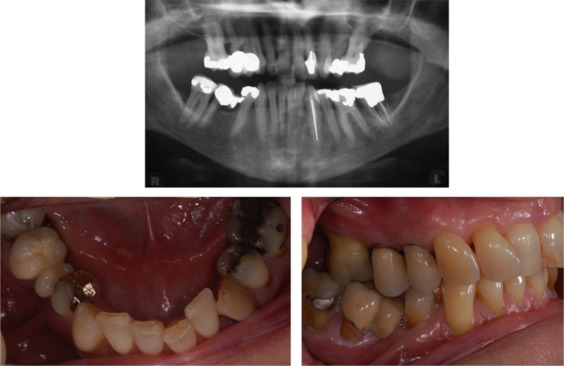
A 58 year old woman was referred by her general dental practitioner for the provision of restorative care of a failing two unit fixed dental prosthesis in the fourth quadrant (Fig. 1 ).
|
|
|
Fig. 1. Pre-operative dental panoramic tomograph and right side lateral and mandibular occlusal views. |
The fixed dental prosthesis restoration (teeth 46–45) was considered terminal and extraction was planned of the 46 abutment tooth. The adjacent teeth 47 and 44 were heavily restored and single cast restorations were considered, however the patient wished to replace the presenting 45 space. A new three unit conventional fixed dental prosthesis restoration was planned for teeth 47–44. It was felt that splinting the 47 and 44 would share the occlusal load imparted on that quadrant without affecting their prognosis. Radiographic generalised periodontal bone loss was evident (Fig. 1 ) but no clinical mobility was detected around the proposed abutment teeth. The generalised periodontal probing profile did not reveal any pockets over 3 mm and no furcation defect was detected on probing the 47. The patient׳s periodontal condition was stable as had been receiving regular periodontal maintenance at a specialist treatment centre.
Provision of the new three unit fixed dental prosthesis involved:
- A comprehensive occlusal examination of the patient.
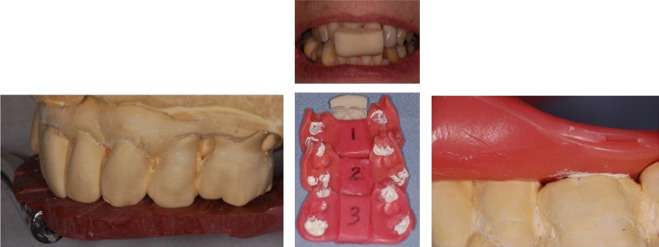
- Alginate impressions taken in metal rimlock trays for the production of diagnostic study casts and subsequent duplication. A facebow record and clinical photographs were also taken. The impressions were poured in vacuum mixed Type III gypsum; the resultant maxillary cast verified for accuracy (Fig. 2 ) and mounted on a semi-adjustable articulator.
|
|
|
Fig. 2. Facebow bitefork with impression compound verification of maxillary study cast. Lucia jig and multiple CR records. Verification of mandibular cast using a CR record. |
- A Lucia jig was used to aid the recording of three CR records made of Moyco beauty wax and TempBond (Fig. 2 ).
- The mandibular cast was verified for accuracy against the CR record (Fig. 2 ) and mounted against the maxillary cast on the semi adjustable articulator. The three CR records were then verified with a Denar Vericheck instrument.
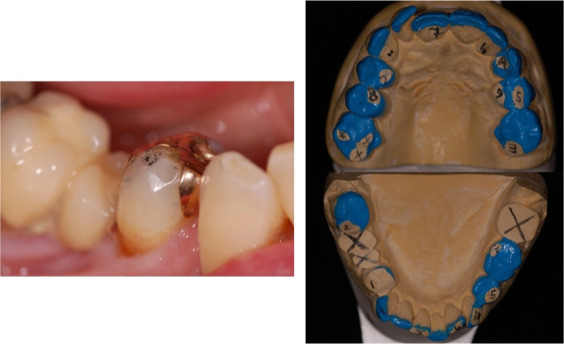
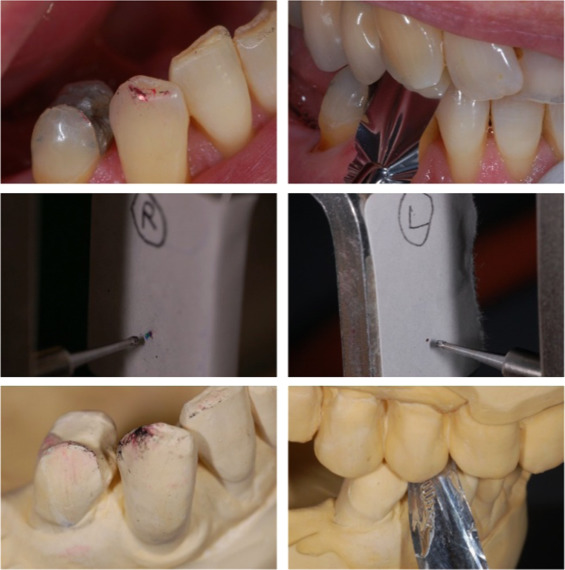
- The CO had been identified intra-orally as being present between the 44 and opposing 14 (Fig. 3 ).
|
|
|
Fig. 3. CO observed on 44 and mock occlusal adjustment for stabilisation with resultant contact between 43 and 13. |
- The 46–45 fixed dental prosthesis was then removed and the 46 root extracted under local anaesthetic. As the 46 socket was healing the 47 and 44 existing restorations were removed, the cavities cleaned and the teeth assessed for restorability using a Tooth Restorability Index [17] . Amalgam core restorations were then placed. The 37 was extracted by the general dental practitioner.
- A mock occlusal adjustment for stabilisation was carried out on the mounted casts (Fig. 3 ) in order to determine where the CO would move to once removed from tooth 44 during the fixed dental prosthesis preparation. It was decided that the adjustments be carried on until the point where the CO landed on a tooth that was mechanically and periodontally stable for adequate occlusal loading. It was deemed after this diagnostic investigation that a large amount of tooth tissue would need to be removed clinically in order to adjust the patient׳s occlusion to this point.
- Consequently, occlusal splint therapy was provided for the patient to allow a longer period of deprogramming to see if there would be any change in the position of the mandible in relation to the maxilla and thereby a difference in where the CO was originally diagnosed. The splint was waxed, processed, polished and the occlusal surface alumina blasted.
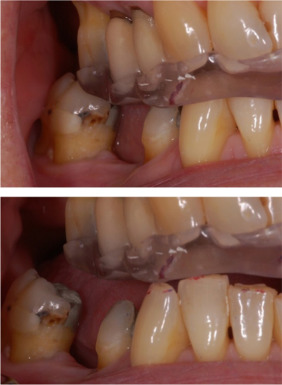
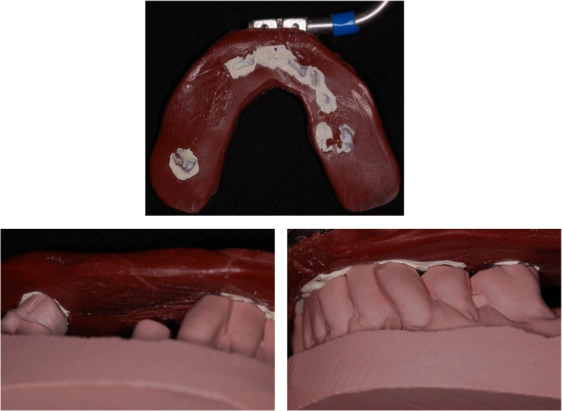
- The splint was fitted and adjustments were made, ensuring again that there was point contact with all the teeth and shallow protrusive and lateral guidance allowing separation of the posterior teeth (Fig. 4 ). A week later the splint was reviewed; all the contacts lateral and protrusive movements were checked again. Minimal adjustments were made to refine the protrusive guidance. The splint was reviewed over a period of time until there were no adjustments required over three consecutive weeks.
|
|
|
Fig. 4. Fitted occlusal splint showing separation of posterior teeth on lateral movements. |
- The occlusal splint had been worn for a period of 3 months after which mandibular repositioning had occurred and the CO was now identified intra-orally between the 43 and 14 (Fig. 5 ). A Lucia jig was again used to aid the recording of three CR records made of Moyco beauty wax and TempBond for remounting the mandibular cast. The three CR records were verified with a Denar Vericheck instrument, all of the three records were coincident with each other demonstrating accurate capture of CR (Fig. 5 ).
|
|
|
Fig. 5. Post-occlusal splint therapy CO contact and shimstock bite foil hold between 43 and 14. Verification of CR records using blue, red and green coloured markings on a Denar Vericheck instrument. Intra-oral observations correlating to findings on diagnostic study casts. (For interpretation of the references to colour in this figure legend, the reader is referred to the web version of this article.) |
- The CO was identified correctly again on the study casts between the 14 and 43, which correlated to the intra-oral findings (Fig. 5 ). The nature of the centric slide was then assessed (Fig. 6 ). From the subsequent findings, a conformative occlusal approach to this case could be used without any planned occlusal adjustments made to any of the other teeth.
|
|
|
Fig. 6. Diagnostic study casts mounted at CR showing horizontal and vertical components of centric slide from CO to MIP highlighted by pencil lines and white arrows. |
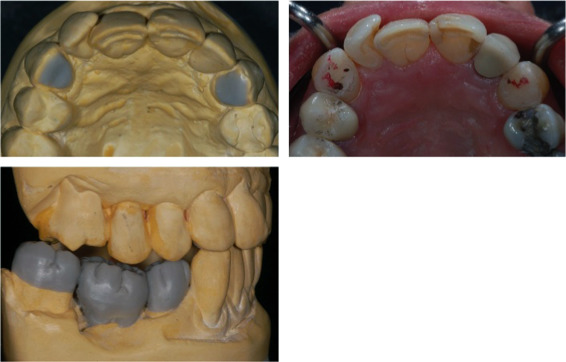
- The palatal surfaces of the 13 and 23 were diagnostically waxed to steepen the canine guidance and improve separation of the posterior teeth in lateral excursions to allow a more anatomical occlusal design and form for the cusps of the fixed dental prosthesis. The 47–44 fixed dental prosthesis was then diagnostically waxed to full anatomical and functional form (Fig. 7 ).
|
|
|
Fig. 7. Diagnostic waxing of 13 and 23 palatal surfaces and 47–44 prosthesis. Steepened canine guidance allows improved separation of posterior teeth on right lateral movement and anatomical cuspal build-up of prosthesis. Completed 13 and 23 palatal composite resin restorations showing static contacts and lateral excursive tracks. |
- The palatal surfaces of the 13 and 23 were recontoured with composite resin under rubber dam isolation as per the diagnostic waxing (Fig. 7 ). This was carried out to steepen and enhance the existing canine guidance offering improved separation of posterior teeth on lateral excursions, which in turn allows improved anatomical build-up of the new fixed dental prosthesis. Gold palatal backings may be adhesively cemented to the palatal surfaces of the 13 and 23 and used as an alternative which may prove more durable for restoration wear in the long-term. The occlusal splint had to be adjusted and relined in these areas with cold cure acrylic additions.
- A preparation of the 44 and 47 on a duplicate cast was made and a heat cured polymethylmethacrylate acrylic shell provisional restoration was produced. The abutment teeth 47 and 44 were prepared for the fixed dental prosthesis and a silicone impression was made in a custom tray. A sectional Moyco beauty wax and TempBond bite registration was taken over the prepared abutment teeth in the fourth quadrant with the patient closed in MIP. The shell provisional restoration was then relined with acrylic resin and fitted.
- The silicone impression was poured for the production of a working model and dies. The working model was verified by using a bitefork recording of the occlusal surfaces of the mandibular teeth using impression compound TempBond before the provisional restoration was fitted (Fig. 8 ).
|
|
|
Fig. 8. Facebow bitefork with impression compound and TempBond reline verification of mandibular working cast. |
- The working mandibular cast was mounted conforming to the existing occlusion using the sectional bite registration made and the fabrication of 44–47 fixed dental prosthesis was carried out.
- The 44–47 definitive fixed dental prosthesis was fitted (Fig. 9 ). The occlusal splint was subsequently adjusted accordingly to allow even contact of the mandibular teeth to it and the patient advised to wear it whilst sleeping (Fig. 9 ).
|
|
|
Fig. 9. Fitted 44–47 definitive fixed dental prosthesis and post-operative occlusal splint after adjustment. |
Summary
The accurate and appropriate occlusal diagnosis for treatment planning is crucial to the management of any dental condition that may have adverse occlusal exacerbations. It was aimed that this article series shed light to the general dental practitioner for the correct recognition, diagnosis and selection of the applicable management strategy and thereby correct treatment of these cases (Table 1 and Table 2 ).
|
|
|---|---|
| |
|
|
| |
| |
|
|
| |
| |
| |
|
|
| |
| |
| |
| |
| |
|
|
| |
|
|
| |
| |
| |
| |
|
|
| |
| |
|
|
| |
|
References
- [1] A. Alani, M. Patel; Clinical issues in occlusion – Part I; Singap. Dent. J., 35 (2014), pp. 31–38
- [2] S.F. Rosensteil, M.F. Land, J. Fujimoto; Contemporary Fixed Prosthodontics; (4th ed.)CV Mosby (Elsevier), St. Louis (2001), pp. 40–100
- [3] P.E. Dawson; Functional Occlusion: From TMJ to Smile Design; (1st ed.)CV Mosby (Elsevier), St. Louis (2007), pp. 93–97
- [4] V.O. Lucia; A technique for recording centric relation; J. Prosthet. Dent., 14 (1964), pp. 492–505
- [5] S.P. Ramfjord, M. Maj.; Ash, reflections on the Michigan occlusal splint; J. Oral Rehabil., 21 (5) (1994), pp. 491–500
- [6] U. Posselt; Studies in the mobility in the human mandible; Acta Odontol. Scand., 10 (Suppl 10) (1952), p. S3
- [7] U. Posselt; Movement areas of the mandible; J. Prosthet. Dent., 7 (3) (1957), pp. 375–385
- [8] R.A. Strohaver; A comparison of articulator mountings made with centric relationand myocentric position records; J. Prosthet. Dent., 28 (4) (1972), pp. 379–390
- [9] C.S. Teo, M.D. Wise; Comparison of retruded axis articular mountings with and without applied muscular force; J. Oral Rehabil., 8 (4) (1981), pp. 363–376
- [10] L. Fattore, W.F. Malone, J.L. Sandrik, B. Mazur, T. Hart; Clinical evaluation of the accuracy of interocclusal recording materials; J. Prosthet. Dent., 51 (1984), pp. 152–157
- [11] K. Warren, N. Capp; A review of principles and techniques for making interocclusal records for mounting working casts; Int. J. Prosthodont., 3 (1990), pp. 341–348
- [12] The glossary of prosthodontic terms; J. Prosthet. Dent., 94 (1) (2005), pp. 10–92
- [13] B.L. Dahl, O. Krogstad, K. Karlsen; An alternative treatment in cases with advanced localized attrition; J. Oral Rehabil., 2 (3) (1975), pp. 209–214
- [14] S. Djemal, D. Setchell, P. King, J. Wickens; Long-term survival characteristics of 832 resin-retained bridges and splints provided in a post-graduate teaching hospital between 1978 and 1993; J. Oral Rehabil., 26 (1999), pp. 302–320
- [15] R. Ibbetson; Clinical considerations for adhesive bridgework; Dent. Update, 31 (2004), pp. 254–265
- [16] K.A. Durey, P.J. Nixon, S. Robinson, M.F.W.-Y. Chan; Resin bonded bridges: techniques for success; Br. Dent. J., 211 (3) (2011), pp. 113–118
- [17] A. McDonald, D. Setchell; Developing a tooth restorability index; Dent. Update, 32 (2005), pp. 343–348
Document information
Published on 20/10/16
Licence: Other
Share this document
Keywords
claim authorship
Are you one of the authors of this document?
