1 Introduction
The quality of structural bonded joints is determined by the mechanical capacity to withstand external loads and service environment. The evaluation of the mechanical performance of a bonded joint is a complex process. However, it is often based on a simplified description of its geometry and on the simple mechanical properties of the bonding interface such as its fracture strength and fracture toughness. The opening mode, i.e. mode I, is the most severe fracture mode to quantify the quality of a bonded joint and it is determined by the critical energy release rate (critical ERR, ). It defines the capacity of a material to sustain mechanical loadings in the presence of flaws and it can be evaluated through different tests such as the double cantilever beam (DCB) test in ISO-25217 [1] or Wedge Test (WT) in ASTM D3762 [2]. These experimental procedures, however, evidence a strong dependence on specimen dimensions, type of adhesive, environmental conditions, external loads, the time of exposure and crack measurement.
While test procedures described in ISO-25217 or ASTM D3762 are designed for bonded joints having a thin bondline thickness and a rigid adhesive (elastic modulus of ≥1 GPa and small deformations), bonded joints used for industrial applications may have a thick bondline thickness and flexible adhesives (low elastic modulus and large deformations before the break). Besides, laboratory test results show a strong dependence on specimen dimensions, making these results difficult to extrapolate to any bonded joint applied in industry, as there are many different geometries. Specific standards for durability studies such as ASTM D3762 provide qualitative results of the degradation process of bonded joints and do not consider a continuous loading condition during environmental exposure, which is very common in industrial applications. Moreover, data reduction methods used to evaluate the fracture energy depend on crack length measurement. Either visual techniques or anaytical approximations can be used to calculate the crack length in fracture tests, but these techniques are not suitable for industrial applications as most bonded joints are hidden or cracks are not visible.
These differences between bonded joints used for laboratory or industrial practices produce uncertainty when bonded joints are designed and may cause mechanical fastening to be preferable over adhesive bonding for some applications. Research work contributing to increase the scope of standard tests may produce a working synergy between laboratory practices and industrial applications, thereby promoting the use of bonded joints. To this aim, the present work summarises the step forward given through the work developed in the Thesis entitled “Development of advanced methods to characterise the fracture behaviour of flexible bonded joints” [3] and proposes different solutions for the characterisation of the fracture behaviour of flexible bonded joints.
The four topics developed in the Thesis deal with the effect of bonded joint geometry on the fracture behaviour of flexible bonded joints, the effect of mechanical loads on durability studies, the development of a new durability test and the applicability of acoustic emissions (AE) technique as a non-destructive test (NDT) to monitor the crack propagation in bonded joints. The present document is structured as follows: first, section 2 describes an analytical method to predict of bonded joints with any width-to-thickness configuration. Second, the effect of external loads on the degradation of bonded joints is analysed in section 3. Section 4 describes a new test procedure developed for durability tests considering sustained load conditions and, finally, section 5 demonstrates the capability of AE technique to monitor the crack growth in bonded joints.
2 Effect of interface dimensions on the fracture behaviour
2.1 State of the art
Fracture tests such as DCB test or WT strongly depend on the geometry of the bonded joints and the constitutive behaviour of its constituent parts.
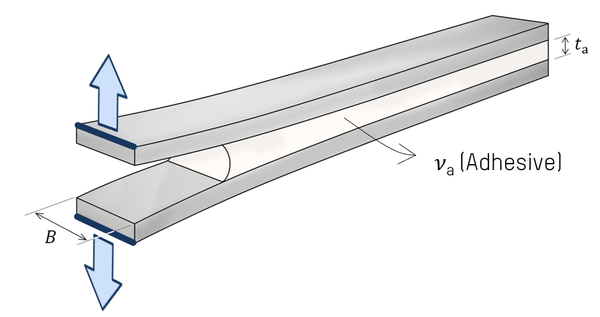
The individual effect of the total width ( ) and bondline thickness ( ) of bonded joints on strength or toughness has been deeply studied. In [4], the effect of the width-to-thickness ratio ( ) on the fracture behaviour of bonded joints is analysed and a relation between the equivalent fracture energy of the bonded joint ( ) and the fracture energy measured for a specific zone in the adhesive layer that is purely under the plane stress state, i.e. the external face of the bonded joint ( ) is proposed:
|
|
(1) |
The correction factor depends on , and the adhesive’s Poisson ratio ( ), and reads:
|
|
(2) |
The simple approach in equation (1) is experimentally and numerically validated in [5]. However, experimental results are lacking to evaluate the influence of on the fracture toughness, especially for thick low modulus adhesives. The present work aims to evaluate the effect of the stress state, i.e. width-to-thickness ratio, on of flexible bonded joints.
2.2 Development
An experimental campaign was developed to evaluate the influence of in the fracture toughness of thick bonded joints having low modulus adhesives and a Poisson’s ratio close to incompressibility. DCB specimens having different widths and thicknesses were manufactured using 3-mm-thick Al 7075-T6 and a silicon-based adhesive Sikasil SG-500 and specimens were divided in two batches depending on the bondline thickness (0.5 mm and 2.0 mm). Fracture tests were carried out following ISO-25217 and the J-integral data reduction method [6] was used to evaluate the fracture toughness. To do so, two capacitive inclinometers type NA3-30 from SEIKA Mikrosystemtechnik GmbH were fixed to each adherend, providing the rotation of the adherends.
Experimental results showed that there is an strong effect of the flexibility of the adhesive on the fracture behaviour of the bonded joint. Due to its flexibility, the adhesive layer was highly deformed. A lateral contraction of the adhesive layer and a longitudinal displacement of the crack tip ( ) were observed during testing, producing a shortening of the effective bondline width ( ) that affects on the fracture behaviour of the bonded joint.
Based on equation (1), an analytical method was developed to predict the of bonded joints with any width-to-thickness configuration, including the effect of the effective bondline thickness. For this purpose, two analytical expressions were developed. The analytical expression to describe the lateral contraction reads:
|
|
(3) |
where is the longitudinal displacement of the crack-tip at the mid-plane of the adhesive layer. is a correction function that reads:
|
|
(4) |
The longitudinal displacement of the crack tip is described as follows:
|
|
(5) |
where is the opening displacement.
Then, a relation between the fracture toughness of bonded joints with different width-to-thickness ratios was proposed:
|
|
(6) |
where is the fracture toughness of a bonded joint with a plane-strain configuration (large configuration). is the fracture energy measured during the test.
2.3 Main results
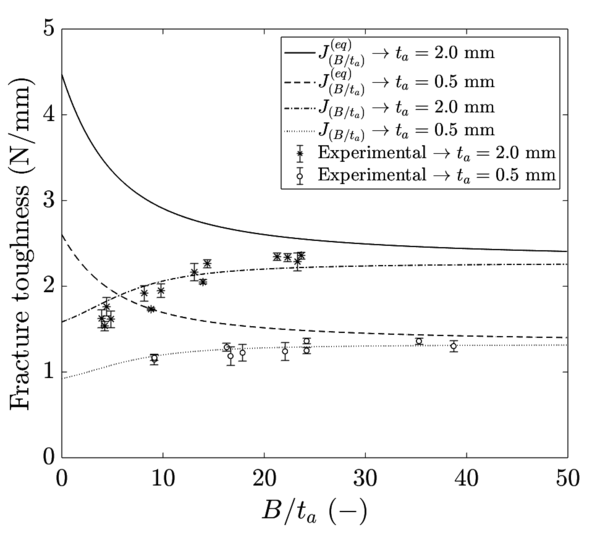
Figure 2 shows the analytical curves given by equation (1) and (6), and the experimental results obtained through DCB tests. It can be observed that is influenced by the stress state, which is governed by and .
Unlike analytical curves given by equation (1), analytical curves obtained through equation (6) match experimental results for 0.5 mm and 2.0 mm thick specimens since it considers the effective width of the adhesive layer. Therefore, the flexibility of the adhesive layer plays an important role in the fracture process of a bonded joint, specially when nearly incompressible adhesives are used.
Further details of the methodology, results and discussion can be found in [7].
3 Effect of a sustained load on durability studies
3.1 State of the art
Adhesive bonds in industrial applications must withstand mechanical loads and environmental conditions simultaneously. Their combination may cause an adhesive bond to degrade at a faster rate and it is of particular concern in primary structures.
Durability studies can be developed either conditioning prior or during testing. Testing after conditioning can be performed following ISO-25217. Testing during conditioning, however, is proposed only by the Wedge Test in ASTM D3762. Few works such as [8,9] discuss about the suitability of these test methods to evaluate the durability of bonded joints conformed by rigid adhesives having thin adhesive layers. However, the applicability of the DCB test or the WT to test specimens with flexible adhesives or thick bondline thicknesses is yet to be assessed. How different are the results obtained through one or the other strategy?
The present work aims to evaluate the effect of external loads during degradation and to assess the suitability of the WT to perform durability tests in thick flexible bonded joints.
3.2 Development
A test campaign was carried out to assess the suitability of the existing experimental methods for the evaluation of the faracture toughness of bonded joints exposed to service conditions.
DCB specimens were manufactured using 3-mm-thick Al 7075-T6 substrates and a silicone-based adhesive Sikasil SG-500. Some specimens were stressed by inserting a wedge into the bonded joint as suggests the WT procedure in ASTM D3762. Then, all specimens were introduced in a climate chamber. Stressed and non-stressed specimens were exposed to specific temperature and humidity conditions: 1000-hour exposure at 85% relative humidity and 82°C temperature. Exposure times studied were 0h, 100h, 300h and 1000h. When any of these exposure times was reached, four specimens were removed from the climate chamber, having two stressed and non-stressed aged specimens. Immediately after, the crack tip was located in stressed bonded joints and the inserted wedge removed. Finally, DCB tests were carried out in stressed and non-stressed specimens and the fracture energy was evaluated to analyse the influence of ageing on the evaluation of the fracture toughness.
Fracture toughness results from WT and DCB tests were compared and their feasibility for durability studies was studied. Difficulties in visual crack length measurement were expected due to the degraded condition of the adhesive. Thus, different data reduction methods were applied and their applicability to evaluate the fracture toughness of the bonded joints was analysed. While the applied crack-length-dependent methods were the one in [10] for the WT and the corrected beam theory (CBT) [1] for the DCB tests, methods independent on the crack length were the compliance-based beam method (CBBM) [11] and the J-integral method.
3.3 Main results
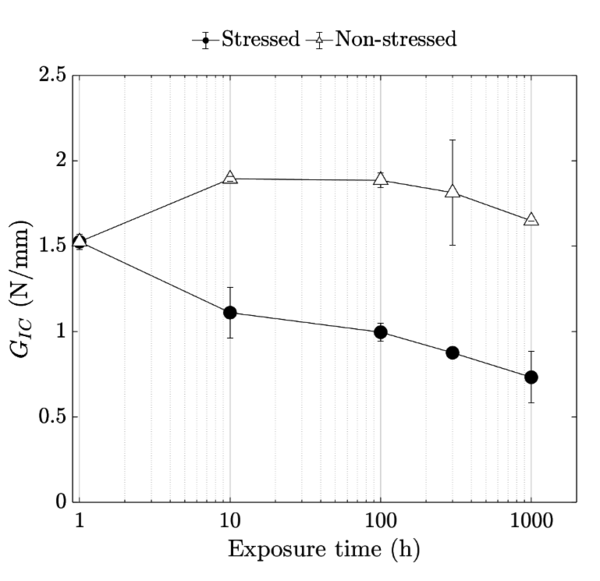
Figure 3 shows the variation of the fracture toughness evaluated in stressed and non-stressed bonded joints. While the fracture toughness of non-stressed bonded joints first increases then decreases with exposure time, of stressed bonded joints decreases exponentially with exposure time. Thus, it is demonstrated that external loads accelerate the degradation process in bonded joints. The deviation between the fracture toughness evaluated through both strategies reaches a 56% at a time of exposure of 1000h.
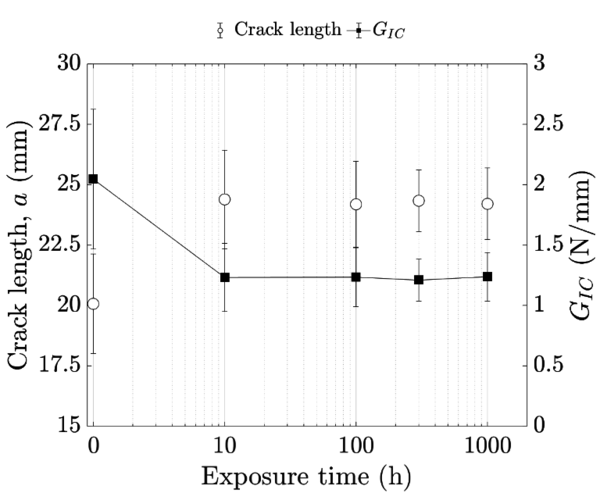
Regarding figure 4, neither the crack lengths measured in the stressed bonded joints through WTs nor the fracture toughness evaluated using [10] show dependence on the time of exposure. The temperature, moisture and the sustained load conditions caused a local stress relaxation of the adhesive near the crack tip that produced the adhesive to weaken and, thus, the crack arrest.
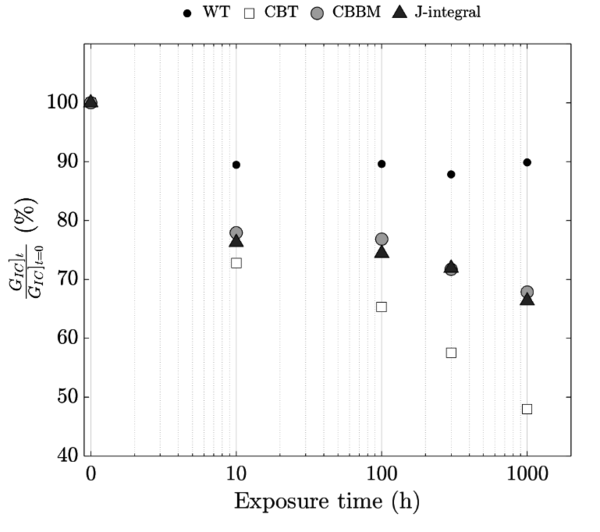
Figure 5 shows the evolution of fracture toughness evaluated in stressed bonded joints through different data reduction methods. While crack length independent data reduction methods, i.e. CBBM and J-integral, provide similar values, crack length dependent data reduction methods provide dissimilar results. The reduction of observed through WT hardly reaches a 10% while the reduction provided by the CBT method exceeds a 50% at a time of exposure of 1000h. The decrement of evaluated using crack length independent data reduction methods is approxiamtely a 30%. Further details of the methodology, results and discussion can be found in [12].
4 Towards a durability test for bonded joints
4.1 State of the art
The lack of consensus on methodologies to evaluate the durability of bonded joints and the recent withdrawal of the WT standard (ASTM D3762) encourage the development of specific test setups that control the environment and monitor changes in bonded joint performance. In this way the service lifetime of bonded joints exposed to external loads, i.e. stressed bonded joints, could be assessed.
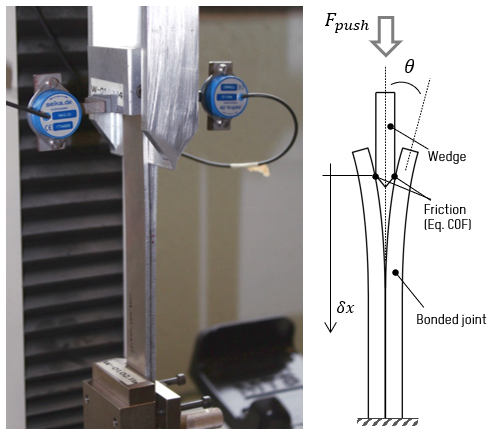
DCB tests required for CBT, CBBM or J-integral methods do not allow the control of load conditions during crack propagation while wedge-type tests require crack length measurement (figure 6). Moreover, the new test rigs and experimental procedures such as the Wedge-Driven Test (WDT) [13], the Smart Wedge (SW) [14] or the dual-actuator test rig in [15] are specific for rigid bonded joints with thin adhesive layers and do not solve the limitations in load control or crack length measurement. However, WDT is presented as the best candidate to reach a test procedure that allows a sustained loading durability test and a data reduction method independent of crack length measurement (figure 7).
Thus, the present work aims to improve the WDT method to avoid friction coefficient estimation for the evaluation of the fracture toughness and to develop a new test procedure suitable for durability tests considering sustained load conditions.
4.2 Development
Based on the WDT method, a new data reduction method named Wedge Driven Test Plus (WDT+) was developed. WDT+ avoids crack length measurement, load tracking, or the estimation of the coefficient of friction by measuring the rotation of adherends to evaluate the fracture toughness of bonded joints. Inclinometers were fixed to adherends and the scope of the WDT was increased towards flexible bonded joints and thick adhesive layers by considering the adhesive thickness in the formulation.
The WDT+ consists in the insertion of a wedge between the adherends at a constant speed to generate a fracture in the adhesive layer, while the specimen is clamped to the frame of the testing machine (figure 8). During the insertion, the wedge moves towards the crack front and both the load needed to move the wedge forward ( ) and the rotation angle of adherends ( ) increase until the crack starts to propagate. At this moment, and reach their maximum values around which will fluctuate during crack propagation. Following the data reduction scheme developed for the WDT+ method, the ERR can be evaluated:
|
|
(7) |
where is adherend’s Young modulus, is the adherend thickness and is the wedge thickness.
An experimental campaign was carried out to assess the WDT+ data reduction method against the DCB test procedure described in ISO-25217. For this purpose, DCB specimens bonded with two high-strength structural adhesives were manufactured: the methacrylate rigid adhesive Araldite 2021 and a silicone-based flexible adhesive Sikasil SG-500.
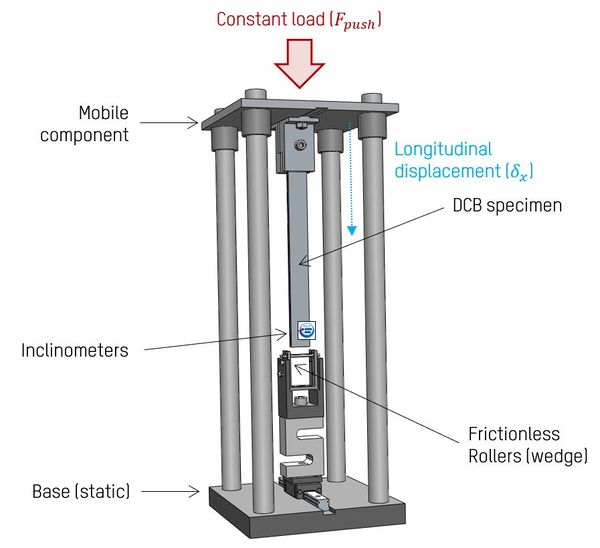
In addition, a new test rig enabling the simultaneous application of a constant load and environmental conditions to bonded joints was developed (figure 9). The new test method applies a constant to a bonded joint that is exposed to environmental conditions. A wedge is inserted in a DCB specimen that is clamped to the frame of the test rig and its crack tip is stressed until the desired time of exposure is completed. Using the WDT+ for durability tests, both the applied load and the energy available to crack the adhesive remain constant throughout the duration of the test and thus, either the crack growth rate or the opening angle are stable. The ERR is continuously evaluted following the WDT+ data reduction method so that the evolution of damage can be monitored.
4.3 Main results
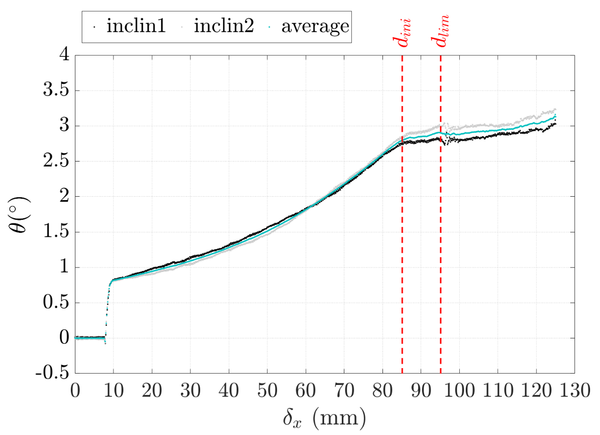
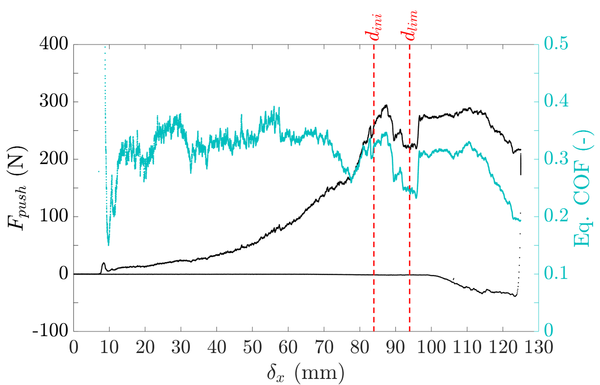
The rotation of adherends was measured to avoid either crack length measurement or the estimation of a friction coefficient to evaluate the fracture toughness of bonded joints (figure 10). The evolution of measured through two capacitive inclinometers type NA3-30 from SEIKA Mikrosystemtechnik GmbH was much more stable than the evolution of the coefficient of friction (COF) or the , which was measured with the load cell during the test.
It is observed that the calculated COF fluctuates during the test and strongly depends on the adherend surface, test speed and interfacial friction coefficient among other variables. Thus, assuming constant COF conditions may produce deviations in the calculated ERR.
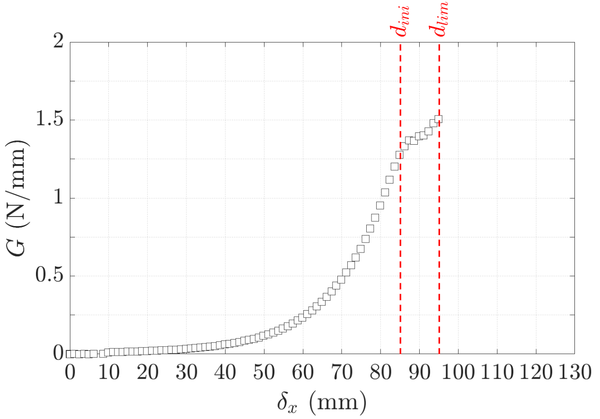
Figure 12 shows a typical ERR-displacement curve obtained thorugh the WDT+ data reduction method. The curve increases monotonically until crack initiation occurs. The fracture toughness is evaluated as the average ERR value between crack initiation ( ) and the limit of the sliding surface ( ). Further details of the development, results and discussion can be found in [16,17].
5 AE technique for crack growth monitoring
5.1 State of the art
Test methods such as DCB test or the WT strongly depend on crack length measurement. However, visual crack localization is challenging specially when tough or aged structural adhesives are analysed since larger fracture process zones (FPZs) are developed ahead of the crack tip. Moreover, small errors in the crack length measurement produce large errors in the evaluation of the fracture toughness. Thus, alternative methods such as structural health monitoring (SHM) techniques are applied to reduce subjectivity.
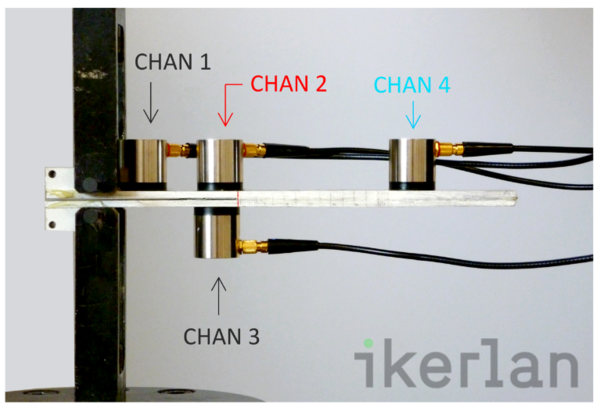
For SHM purposes, NDTs are of great interest for industry due to their capacity to examine materials and structures without changing or destroying their usefulness. NDTs comprise different crack length monitoring techniques [18], such as strain measurement [19], ultrasonics [20] and acoustic emissions. However, although different NDT methods exist for crack location, AE is the unique method that provides direct and continuous information about any event produced in a material or structure (figure 13).
Several studies analyse AE events generated in bonded joints and provide some guidance for locating and identifying AE events occurring within adhesive joints [21,22], but experimental evidence is lacking for any rigorous conclusions, specially since the presence of an FPZ ahead of the crack tip also denotes damage [23]. These studies exemplify the lack of experimental data on techniques such as AE that do not use fungible sensors to detect, locate and identify cracks when obtaining the fracture properties of bonded joints with metallic adherends.
The present work aims to assess the applicability of AE for the real-time monitoring of mode I crack growth in bonded joints.
5.2 Development
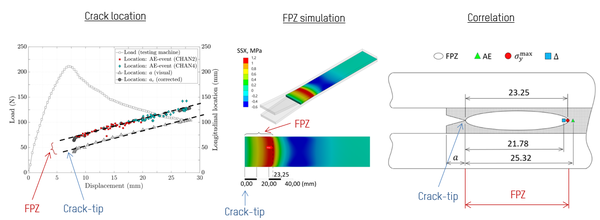
DCB specimens were manufactured by bonding 3-mm-thick Al 7075-T6 adherends with rigid (Araldite 2021) and flexible (Sikasil SG-500) adhesives. While mode I fracture paths were generated following DCB test protocol in ISO-25217, acoustic sensors were coupled to the bonded specimens to process the acoustic events generated during crack growth (figure 13). An appropriate filtering strategy was selected and location results of acoustic events were compared with the visually tracked crack propagation ( ) and the corrected crack length ( ) calculated through the CBT data reduction method. Finite element (FE) simulations were carried out to correlate the experimental evidence to the FPZ, which provided the location of the maximum peel stress inside the adhesive layer ( ).
5.3 Main results
Regarding figure 14, AE event detection began when the visible crack propagation started. The point clouds followed the visually measured crack length, but with some dispersion. A linear regression fit of the point cloud revealed that the AE point cloud followed the crack length measured visually with an average offset that was located close to obtained through FE simulations and . The clear gap observed between the visual crack length and AE data was related to the FPZ of the bonded joint, which varies depending on the adhesive type.
Experimental and numerical work demonstrated that AE is valid for mode I crack growth monitoring in rigid and flexible bonded joints. AE removes subjectivity in crack length measurement and the size of the FPZ can be quantified. Further details of the development, results and discussion can be found in [24].
6 Conclusions
New analytical and experimental procedures have been developed for the structural characterisation of flexible bonded joints. Although the analytical model described in section 2 is focused on flexible bonded joints, the experimental methods are feasible for either rigid or flexible bonded joints and increase the scope of existing test methods towards thick bondline thicknesses typical in industrial applications.
In summary, it is demonstrated that the interface dimensions have a strong effect on the fracture behaviour of bonded joints. In response, a new method is proposed to evaluate the of flexible bonded joints with any width-to-thickness configuration. It is also demonstrated that sustained loads accelerate the degradation of bonded joints exposed to environmental conditions. In response to the lack of experimental methods to evaluate the degradation of bonded joints exposed simultaneously to external loads and environmental conditions, a new data reduction named WDT+ and a durability test have been developed. The proposed test setup enables a real-time evaluation of the ERR and reduces the testing time since parallel tests can be performed being the unique limitation the space inside the climate chamber. Moreover, it is valid for any type of adhesive and bondline thickness and may be adaptable to different failure modes or fatigue tests.
Finally, it is demonstrated that the AE technique is suitable for crack growth monitoring in bonded joints. Real-time mode I crack growth monitoring can be obtained using AE while AE events are strongly related to the maximum peel stress during fracture, either in rigid or flexible bonded joints.
The present work gives a step forward and proposes different solutions for the characterisation of the fracture behaviour of flexible bonded joints, contributing to the use of bonded joints in industry.5
References
[1] ISO 25217:2009, “Determination of the mode I adhesive fracture energy, GIC, of structural adhesives using the double cantilever beam (DCB) and tapered double cantilever beam (TDCB) specimens,” International Organization for Standardization, 2009
[2] ASTM D3762-03(2010), “Standard test method for adhesive-bonded surface durability of aluminium (Wedge Test),” ASTM International, 2010
[3] PhD Thesis, J. Manterola, 2020. Development of advanced methods to characterise the fracture behaviour of flexible bonded joints.
[4] M. Cabello, A. Turon, J. Zurbitu, J. Renart, C. Sarrado, and F. Martínez, European Journal of Mechanics, A/Solids, 63, pp. 22–35, (2017)
[5] M. Cabello, J. Zurbitu, A. Turon, C. Sarrado, J. Renart, and F. Martínez, 17th European Conference on Composite Materials, Munich (2016)
[6] . A. J. Paris and P. C. Paris, International Journal of Fracture, 38, 1 (1988).
[7] J. Manterola, M. Cabello, J. Zurbitu, J. Renart, A. Turon, J. Jumel and I. Urresti. Engineering Fracture Mechanics, 218, 106584 (2019)
[8] R. D. Adams, J. W. Cowap, G. Farquharson, G. M. Margary, and D. Vaughn, International Journal of Adhesion and Adhesives, 29, 6, pp. 609–620 (2009)
[9] G. Jhin, S. Azari, A. Ameli, N. V. Datla, M. Papini, and J. K. Spelt, International Journal of Adhesion and Adhesives, 46, pp. 74–84 (2013)
[10] D. Plausinis and J. K. Spelt, International Journal of Adhesion and Adhesives, 15, 3, pp. 143–154 (1995).
[11] M. F. S. F. de Moura, R. D. S. G. Campilho, and J. P. M. Gonçalves, Composites Science and Technology, 68, 10-11, pp. 2224– 2230 (2008)
[12] J. Manterola, J. Zurbitu, J. Renart, A. Turon and I. Urresti. Polymer Testing, 88, 106570 (2020)
[13] J. Renart, J. Costa, G. Santacruz, S. Lazcano, and E. González, Engineering Fracture Mechanics, 239, 107210 (2020).
[14] D. O. Adams, H. M. McCartin, and Z. Sievert, JAMS Technical Review Meeting, Long Beach (2018).
[15] S. Fevery, H. Hallez, D. Vandepitte, and S. Debruyne, The Journal of Adhesion, 96, pp 461-473 (2019).
[16] J. Manterola, J. Renart, J. Zurbitu, A. Turon and I. Urresti. Mechanics of Materials, 148, 103534 (2020).
[17] J. Manterola, J. Zurbitu, M. Cabello, I. Urresti, J. Renart and A. Turon. WO2021152187A1 (2020)
[18] R. D. Adams and B. W. Drinkwater, NDT and E International, 30, 2, pp. 93–98 (1997).
[19] M. Budzik, J. Jumel, K. Imielinska, and M. E. R. Shanahan, International Journal of Adhesion and Adhesives, 29, 7, pp. 694–701 (2009)
[20] H. Chan, B. Masserey, and P. Fromme, Smart Materials and Structures, 24, 2, 025037 (2015).
[21] A. Crawford, M. G. Droubi, and N. H. Faisal, Journal of Nondestructive Evaluation, 37, 2, (2018)
[22] A. Crawford, M. G. Droubi, and N. H. Faisal, 33rd European Conference on Acoustic Emission testing, Senlis (2018)
[23] J. Cabello, J. Zurbitu, J. Renart, A. Turon, and F. Martínez, International Journal of Solids and Structures, 94-95, pp. 21–34 (2016)
[24] J. Manterola, M. Aguirre, J. Zurbitu, J. Renart, A. Turon and I. Urresti. Engineering Fracture Mechanics, 224, 106778 (2020)
Document information
Published on 13/10/21
Accepted on 06/10/21
Submitted on 23/09/21
Volume 05 - Comunicaciones Matcomp19 (2021), Issue Núm. 4 - Tesis doctorales presentadas al premio AEMAC a la mejor tesis., 2021
DOI: 10.23967/r.matcomp.2021.10.006
Licence: Other
Share this document
Keywords
claim authorship
Are you one of the authors of this document?
