ROTARY DRAW-BENDING MACHINE
M. SC. DARWIN ABELE 2, M. SC. SVEN HOFFMANN 3, DR. APARECIDO FABIANO PINATTI DE CARVALHO 3, UNIV.-PROF. DR.-ING. BERND ENGEL 1, PROF.-DR. MARCUS SCHWEITZER 2, UNIV.-PROF. DR. VOLKER WULF 3
Key words: Equipping process, rotary draw bending, FE simulation, parameter influence, cyber physical systems, industry 4.0
Abstract. The tool setting process for rotary draw-bending is very complex. Only experienced machine operators know which settings lead to a good result in relation to the bending task. Up to seven individual tools can be installed, positioned and set in the process independently. A complete set of tools consists of: pressure die, mandrel, wiper die, inner and outer clamp die as well as the bend die and the collet or piston bend. [1] Furthermore there are the axis settings, which can be adjusted with the parameters distance, force, angle, torque and time. If a defect occurs after the successful set-up process the machine operator has various possibilities to solve the problem. The effects of the different setting parameters and the procedure for the fastest possible elimination of the error are often unclear. The goal is to be able to use an adjustment support for the setting process by means of physical-analytical principles and systematically constructed FE simulations at the bending machine. In order to evaluate the bending result, the condition of the bending component is examined concerning the quality characteristics, cracking, wrinkling, cross-section deformation and elastic deformation. [2] Based on performed and analyzed FE simulations, adjustment recommendations regarding the respective quality characteristics are to be established as well as predictions about possible defects. The simulation and calculation results flow into a database. This is used for the implementation of an electronic expert, who uses a visualization aid to provide the machine operator with information and recommendations on the setup settings. This avoids errors during the equipping process and saves set-up time. Machine operators and particularly trained employees are guided and supported in their work.
1 INTRODUCTION
At present, the set-up process and the adjustment process of the rotary draw bending are mainly based on the knowledge of the machine operators, which can result in high subjectivity. Particularly in the case of work sequences with intensive set-up times, a shortening of this non-value added activity is very important. This fact is multiplied when small series or individual components have to be realized. Interviews revealed that it often takes at least six months until a new trained employee, trained by experienced machine operators, can carry out his first set-up process by herself or himself. The transfer of information is cumbersome and the first economic set-up times are not reached until the employee has acquired his own experience. The aim of the joint research project "Cyber equipping 4.0 - cyber-physical support of humans during the set-up process using the example of a bending process for small-scale production on the basis of a knowledge transfer approach" is the quantification of the machine operator's experience knowledge in order to implement a setting rule and a set-up support for the machine operators using the approach of mental modeling. This set-up support should also be able to capture and process information using new possibilities of visualization, such as augmented reality technology. In order to be able to equip this set-up support with important process knowledge, FE simulations are to illustrate the influence of setting parameters on the quality characteristics of the bending component and to check and evaluate the results for universal validity. The first results of this research project are to be disclosed as followed.
2 THEORY
According to [2], rotary draw bending is a forming process which is shape-related.
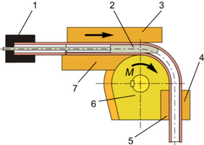
Prior to the bending process the tube is pushed over the mandrel from the front and fixed in the piston bend as well as between the inner and outer clamp dies. After that the bend die rotates around the bending center with the required bending angle. The tube is thereby pulled around the bending center while it is in contact with the cavity in the bend die. The outer clamp die rotates around the same center point so that the tube end remains fixed over the entire process. The pressure die serves to absorb the reaction force from the bending moment. Moreover, the pressure die can transmit a force through the tube and the inner mandrel on the wiper die. This passive reaction force superimposes the compressive stresses on the inner arc of the tube bow to prevent wrinkling. In addition to the function as a force-transmitting element, the mandrel serves for geometrically supporting the hollow profile. An ovality can thus be countered. After the bending process has been completed, the bend part is released from the clamping of the outer and inner clamp dies. After the movements of the machine axes to their basic positions are done, the next bending can be carried out or the component can be removed after releasing the clamp die. The torque required for bending, initiated by the bend die, is transmitted to the plurality of tools and dissipates different reaction forces. This results in a complex force profile along the tube to be bent. In addition, up to seven different tools can be set independently of each other (figure 1). The settings are based on the position (translational displacement and rotational orientation), in selecting the correct speeds, as well as accelerations and the resulting process times. These aspects make the flexural bending process a complicated forming process that reacts very sensitively to parameter variations. Finding connections between setting parameters and bending results and then handing them over to other employees is difficult and time-consuming. There is a great demand for a visualization instrument, which combines know-how with a visual, comprehensible presentation.
2.1 Equipping process
A tool setting process can be subdivided into a static and a dynamic component. The static tool setting process includes all in-house activities and necessities, which are indispensable for the actual set-up task. This includes the provision of tools and the maintenance of storage areas, as well as the infrastructure necessary for the correct allocation of tools to bending components. In addition, the static part includes the set-up process itself. This involves dismantling the old tool set and installing the new tool sets. It is also distinguished into a small, as well as a large set-up process, depending on how many tools have to be exchanged. The dynamic tool setting process includes all activities which are to be carried out after the static tool setting process. These include in particular parameter variations within the machine control for setting the process, as well as the adjustment of the process due to component faults. For a fast, targeted adjustment of the process parameters, a strong process understanding is necessary.
2.2 Quality characteristics
The VDI 3431 [2] currently comprises over twenty different quality characteristics on the bending component which can be tested both quantitatively and qualitatively according to the customer's requirements (see also [1], [3], [4]).
| characteristic | formular-symbol |
| Inner and outer diameter | Di, Da |
| Bending radius | Rth |
| Bending angle | α |
| Cross-section area | - |
| Cracking (DIN EN ISO 8785) [3] | - |
| Roundness of tubes | - |
| Wall thickness | s |
In the context of this publication, the quality characteristics cracking on the outer curve and ovality or cross-section deformation were analyzed using FE simulations.
3 DISCUSSION
3.1 Simulation software
With the aid of the FE simulation program PAM-Stamp 2G of the ESI-Group, Neu-Isenburg Germany, a simulation model was modeled according to the real process of the company Westfalia Metallschlauch GmbH, Hilchenbach Germany.
The quality characteristics explained in chapter 2.2 can be assigned to different process parameters by which these are influenced. The parameters of the rotary draw bending process to be set are listed in table 2. The adjustment parameters were modeled in PAM-Stamp 2G with the semi-finished material 1.4512, a tube outer diameter of Da = 101.6 mm, a wall thickness of 2 mm, a bending angle of 127.7°, and a bending ratio of 1 × Da.
3.2 Reference simulation
In order to find out in how far and strong which process parameters influence the bending result, an OFAT study (one factor at a time) was first carried out. For this purpose, a reference simulation was set up, in order subsequently to vary successively individual process parameters. The reference simulation generates a bending result, which is classified as a good part, in accordance with customer’s wishes and requirements. A large number of simulations arose, which after evaluation contribute to the improvement of the process understanding. Table 2 shows the values for which the process parameters were set during the reference simulation. Within the contact definition, the COULOMB's coefficient of friction was specified as tangential behavior.
| Process parameter in PAM-Stamp 2G |
Value | Unit |
| Clamp die force | 125 | kN |
| Clamp die coefficient of friction | 0.4 | - |
| Piston bend speed | 7.5 | mm/s |
| Mandrel position | 0 | mm |
| Mandrel speed | 19 | mm/s |
| Mandrel coefficient of friction | 0.05 | - |
| Presure die displacement | 0.15 | mm |
| Pressure die speed | 9.4 (= 94 % ) | mm/s |
| Pressure die coefficient of friction | 0.2 | - |
| Wiper die position | 0 | mm |
| Wiper die coefficient of friction | 0.15 | - |
In the first 2 s of the simulation time the clamping of the tube is made. Only after the clamping force has reached 100 %, the forming begins. The feed rate is reduced via the piston bend during the conversion from second 6 (c.f. figure 2 l.h.). This results in less wrinkling. The mandrel is initially left at its starting position during the forming process, which is also shown in figure 2 r.h. In the last 5° of the bending angle, the mandrel is retracted, while at the same time the rotational speed of the bend die and the pressure die displacement in transversal direction (c.f. figure 3 l.h.) are reduced. The paths marked green and red show the setting limits between which a parameter variation was performed.
The speed of the pressure die is dependent on the rotational speed of the bend die , related to the outside radius of the tube bow. For this reason, the coefficient is introduced. If this coefficient is 100 %, the speed of the pressure die is exactly the same as the rotational speed of the outer bow of the tube. In the case of the bending task simulated here, the angular velocity amounts and thus the rotational speed of the outside bow is . In figure 3 r.h., the amplitude profile of the displacement which the pressure die moves in longitudinal direction at specific simulation times is shown. Moreover, the coefficienst of the shown velocities are displayed in percent.
At the displacement of the pressure die in longitudinal direction there are three different speed ranges during the bending process. The initial speed, up to second 6, is 33 % above the tube speed. This is followed by a variable speed up to second 25. If the bending angle is exceeded 90°, a continuously low end speed of 60 % of the tube speed is used. During the last 5° the speed of the pressure die is 0 mm/s.
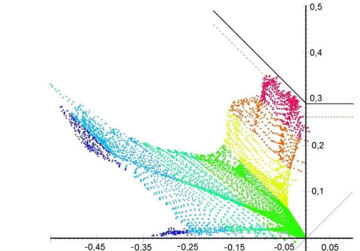
The forming limit diagram was used for the evaluation of the simulations. This represents the maximum main transformation degree φ over the minimum main transformation degree φ. For the failure limit, a simplified calculation model according to [5] with a constant value for the positive range of φ and a constant slope of -1 for the negative range of φ was used. Figure 4 shows the forming limit diagram of the reference simulation.
3.3 Key indicators for assessing the failure criteria
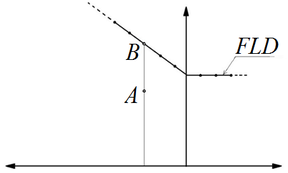
The value FLDCRT, forming limit diagram failure criterion, is used for the failure criterion cracking on the outer radius [6]. The FLDCRT value is calculated for a point A in figure 5 according to equation (1).
|
|
(1) |
In order to be able to compare the simulations, the FLDCRT value is determined from each point of the forming limit diagram. Then the largest value is stored as a comparison characteristic value. If the value of an evaluated simulation is less than 1, the bending part is crack-free. If the value exceeds 1, at least one FLD point has exceeded the limit shape change and the component fails.
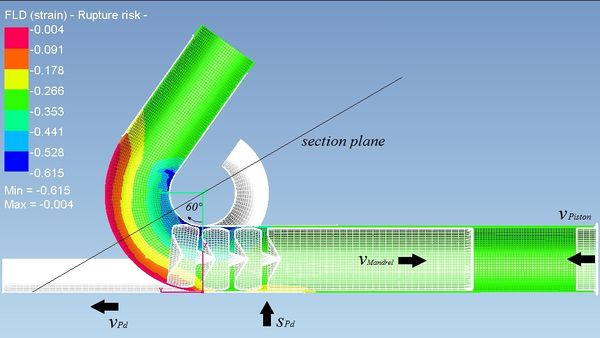
Figure 6 shows the FLD distance value of PAM-Stamp 2G, which indicates the distance between point A and point B, where a negative distance corresponds to a point A below the forming limit curve (c.f. figure 5). The FLDCRT value is calculated from this value.
For the failure criterion ovality, the out-of-roundness u is calculated according to VDI 3430 [1] from the coordinates of the simulations at an angle of 60° of the arc. For this purpose, in the simulation program, as shown in figure 6, a cutting plane is laid through the tube at the 60° angle and the coordinates of each node point of the tube cross-section are stored out. Subsequently, the tube outer diameter in the direction of the main axis and the secondary axis are calculated, and the percentage of the out-of-roundness u is determined.
The simulated bends pass through a spring back program of PAM-Stamp 2G before being evaluated to measure the comparative values of the unclamped tubes.
3.4 Quality characteristic cracking
The process parameters which are explained in more detail in chapter 3.2 and also displayed in figure 6 are the pressure die displacement , which corresponds to the adjusting force of the pressure die, the characteristic number , as well as the piston bend speed . The effects of the variation of these three parameters on the quality characteristic cracking are shown in the following figures.
If the pressure die displacement values are less than 0.05, the bending parts are located in the cracking area (FLDCRT> 1), as can be seen in figure 7. At values between 0.05 to 0.25, the cracking probability decreases to FLDCRT = 0.894. At a pressure die displacement of 0.3 mm, the cracking probability increases again. 0.3 mm corresponds to the clearance between the mandrel and inner wall of the tube, which is reduced by the pressure die at a displacement of 0.3 mm to 0 mm. This probably leads to a higher friction.
As can be seen in figure 8, a raising pressure die speed is lowering the cracking probability. At a pressure die length of 460 mm (blue marking), the supporting effect of the pressure die seems to decrease at the speed coefficient of 90 % therefore the cracking probability is increasing. At a speed coefficient higher than 90 %, the pressure die moves so far that less than 1/3 of its length fits closely to the tube. This reduces the supporting effect. In simulations with a bigger pressure die length of 670 mm (red marking) the cracking probability does not rise at higher speeds. The supporting effect is retrained.
As figure 9 shows, the cracking probability decreases with an increasing piston bend speed. The first three, red marked values pertain to simulations, in which the piston bend was slower than the end of the tube, so it has never touched the end face of the tube. Thus the values correspond to a boost speed as good as 0 mm/s. The valuation shows that it is not possible to bend completely without piston bend at this bending task, as, according to the FLDCRT value, the tube will crack.
A rising speed ensures a slight increase in the probability of cracking, as can be seen in figure 10. A polynomial trend line second degree connects the points.
3.5 Quality characteristic ovality
The three process parameters, already explained in chapter 3.2, have also been varied for the quality characteristic ovality. The effects of the variation to the ovality are shown in the following illustrations.
Figure 11 displays that at a pressure die speed lower than the speed of the tube’s outer bow (blue marking 94 %), a rising infeed till 0.15 mm causes an expansion of the ovality, the tube’s outer bow might be braked stronger. At a higher pressure die speed, (red marking 130 %), a rising delivery causes a reduction of the ovality. At this point, the boost effect might be strengthened.
At a pressure die displacement of 0.16 mm in figure 11, the out-of-roundness decreases and slowly starts to increase again. The influence of the pressure die displacement to the out-of-roundness u seems to be in interaction with the mandrel shaft. The mandrel shaft‘s diameter amounts to 97.3 mm and the internal tube diameter amounts to 97.6 mm, so the radius has a 0.15 mm clearance. The first contact between the inner wall of the tube and the mandrel shaft is initiated at a displacement of 0.15 mm. If this infeed is increased, the mandrel gets slightly pushed out of its position by the pressure die. The active friction forces increase. At a displacement of 0.3 mm there is no clearance between the mandrel and the inner wall of the tube anymore. Simulations with higher displacements led to oversized, unwanted bulges.
According to figure 12, the out-of-roundness decreases at a rising pressure die speed. On this
bending task, the speed of the tube center has 66 % of the rotation speed of the tube’s outer
bow. At a simulated speed of 65 %, the out-of-roundness is at a particular high level.
As can be seen in figure 13, varying the piston bend speed has no clear influence on the out-of-roundness. The first, red marked value pertains to a simulation, in which the piston bend was slower than the end of the tube, so it has never touched the end face of the tube (no boost effect due to the piston bend).
Figure 14 shows that to vary the mandrel speed does not allow any conclusions to be drawn about the ovality.
4 CONCLUSION
The evaluation of the simulations has shown that the process parameters of the pressure die influence the bending result in a massive way. The piston bend and the mandrel do not have such an important impact to the bending result. This realization underlines the approach of adjusting the process parameters in the course of an equipping process, as previously recommended by our chair of forming technology (also seen in figure 15). This process aims in the first place to increase the pressure die speed and the displacement of the pressure die, till the error pattern is repaired. Thereby, it is important to pay attention to the interaction of the tube’s speed at the tube’s outer bow and with that to the rotation speed of the bend die, as well as to the interaction of the mandrel shaft‘s diameter and the resulting clearance to the inner wall of the tube.
5 OUTLOOK
All of the described investigations highlight the dependency of the configurable process parameters to the quality characteristics of the bending components of cracking and ovality. In the next working steps, actual bending tests will be carried out, based on the bending task shown in this paper, and the results will be compared to the described simulation results. The overall aim of the investigation is to provide the visualization tool, as planned in the project cyber equipping 4.0, with a software, which specifically saves process data of every bending and performs an automatic evaluation. The simulations should provide a knowledge database, which is little by little extended with results of actual bending processes. Based on these results, the visualization tool should output recommendations to parameter corrections, depending on the presented error pattern. The accuracy of the recommendations should increase with growing data quantity. In this way, machine operators and especially trained employees can be guided and supported in their activity.
6 ACKNOWLEDGEMENT AND REMARK
This project is supported by the European Union and the state of North Rhine Westphalia.
Investition in unsere Zukunft – Europäischer Fonds für regionale Entwicklung. EFRE.NRW Investition in Wachstum und Beschäftigung; www.efre.nrw.de; www.wirtschaft.nrw.de
| |
Other project partners are:
Westfalia Metallschlauch GmbH, Hilchenbach:
Dipl.-Ing. Oliver Selter, Dipl.-Ing. Marcus Hupertz, Sascha Sckudlarek,
Lachmann und Rink GmbH, Freudenberg:
Dr. Matthias Hebbel, Dipl.-Ing. Stefan Thilo
REFERENCES
[1] VDI 3430 Rotary draw bending of profiles, 06.2014
[2] VDI 3431 Bending of profiles – Testing notes for profile bending elements, 08.2016
[3] DIN EN ISO 8785 Geometrische Produktspezifikation (GPS), 1990
[4] C. Kuhnhen Bewertung und quantitative Beschreibung von Rohrbiegebauteilen anhand von Kennziffern zur Feststellung der Rückwirkungen ausgewählter Qualitätsmerkmale auf Produktion und Produktanwendung, 2016
[5] R. Steinheimer Prozesssicherheit beim Innenhochdruck-Umformen, 2005
[6] SIMULIA Abaqus 6.14, 04.2017 (http://50.16.225.63/v6.14/books/usb/default.htm)
Document information
Published on 23/12/17
Submitted on 15/12/17
Licence: Other


