Dpiedrafita (talk | contribs) (Created page with " <span id='_heading=h.fy5meykso2jv'></span> =1. Introduction= The accurate measurement of interlaminar fracture toughness at cryogenic temperatures is crucial for understa...") |
Dpiedrafita (talk | contribs) (Tag: Visual edit) |
||
| Line 26: | Line 26: | ||
[[Image:Draft_Piedrafita_909171428-picture-Grupo 2139144324.svg|center|600px]] | [[Image:Draft_Piedrafita_909171428-picture-Grupo 2139144324.svg|center|600px]] | ||
| − | |||
| − | |||
<div class="center" style="width: auto; margin-left: auto; margin-right: auto;"> | <div class="center" style="width: auto; margin-left: auto; margin-right: auto;"> | ||
| Line 52: | Line 50: | ||
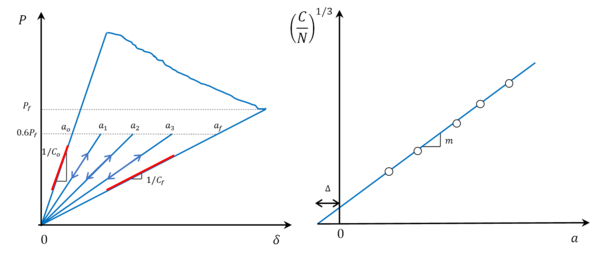
where <math display="inline">\Delta</math> is the crack length correction, <math display="inline">m</math> is the slope of the curve and N is the loading block correction factor [6]. The specimen compliance can be computed by the measured load applied and the corrected displacement, i.e., <math display="inline">C=</math><math>\delta /P</math>, so Linear Elastic Fracture Mechanics (LEFM) applies, and the fracture process zone (FPZ) is assumed to be small compared to the specimen dimensions and crack length. Equation (1) can be experimentally fitted through loading/unloading tests at different known crack lengths without crack propagation. This calibration procedure is done in one specimen per batch. To minimize the number of thermal cycles into the specimen, the following test procedure is used (illustrated in Figure 2 left). The specimen is first tested in LN2 until reaching a sufficient crack extension and unloaded back to zero force. This allows the calculation of the specimen compliance at two known crack lengths ''( '' <math display="inline">{a}_{o}</math> and <math display="inline">{a}_{f}</math>'')''. Then, the specimen is heated up back to RT and a new crack length is set by adjusting the side clamp block. The test is then repeated without crack propagation, applying a maximum load equal to 60% of the measured at the unloading. This procedure is repeated 2-3 times, with effective crack lengths ranging from 40 to 105 mm, which is the propagation range suggested by the standard. As a result, a relationship between the compliance of the specimen and its crack length can be obtained, as shown in Figure 2 right. | where <math display="inline">\Delta</math> is the crack length correction, <math display="inline">m</math> is the slope of the curve and N is the loading block correction factor [6]. The specimen compliance can be computed by the measured load applied and the corrected displacement, i.e., <math display="inline">C=</math><math>\delta /P</math>, so Linear Elastic Fracture Mechanics (LEFM) applies, and the fracture process zone (FPZ) is assumed to be small compared to the specimen dimensions and crack length. Equation (1) can be experimentally fitted through loading/unloading tests at different known crack lengths without crack propagation. This calibration procedure is done in one specimen per batch. To minimize the number of thermal cycles into the specimen, the following test procedure is used (illustrated in Figure 2 left). The specimen is first tested in LN2 until reaching a sufficient crack extension and unloaded back to zero force. This allows the calculation of the specimen compliance at two known crack lengths ''( '' <math display="inline">{a}_{o}</math> and <math display="inline">{a}_{f}</math>'')''. Then, the specimen is heated up back to RT and a new crack length is set by adjusting the side clamp block. The test is then repeated without crack propagation, applying a maximum load equal to 60% of the measured at the unloading. This procedure is repeated 2-3 times, with effective crack lengths ranging from 40 to 105 mm, which is the propagation range suggested by the standard. As a result, a relationship between the compliance of the specimen and its crack length can be obtained, as shown in Figure 2 right. | ||
| − | [[ | + | [[File:Fig2 CC method.png|600x600px]] |
<div class="center" style="width: auto; margin-left: auto; margin-right: auto;"> | <div class="center" style="width: auto; margin-left: auto; margin-right: auto;"> | ||
| Line 91: | Line 89: | ||
Interestingly, fracture surface analysis reveals a shift in the adhesive failure mode, transitioning from a 50% adhesive/cohesive failure at RT to predominantly cohesive failure at 77K. | Interestingly, fracture surface analysis reveals a shift in the adhesive failure mode, transitioning from a 50% adhesive/cohesive failure at RT to predominantly cohesive failure at 77K. | ||
| − | [[ | + | [[File:Fig3 P d results.png|600x600px]] |
<div id="_heading=h.9y5wty6v1nzy" class="center" style="width: auto; margin-left: auto; margin-right: auto;"> | <div id="_heading=h.9y5wty6v1nzy" class="center" style="width: auto; margin-left: auto; margin-right: auto;"> | ||
| Line 98: | Line 96: | ||
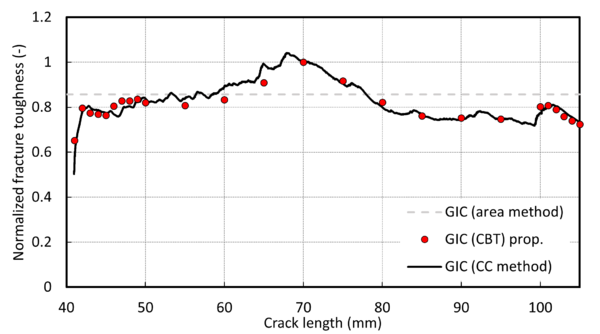
Figure 4 shows the normalized fracture toughness determined by the standard CBT method, the CC and the area methods for a representative specimen tested at RT. Normalization is done with respect to the maximum GIc obtained using the standard CBT method. The results indicate an excellent agreement between the fracture toughness computed following the two different methods. Notably, similar results were observed across the rest of the specimens in the batch, further validating the CC method. | Figure 4 shows the normalized fracture toughness determined by the standard CBT method, the CC and the area methods for a representative specimen tested at RT. Normalization is done with respect to the maximum GIc obtained using the standard CBT method. The results indicate an excellent agreement between the fracture toughness computed following the two different methods. Notably, similar results were observed across the rest of the specimens in the batch, further validating the CC method. | ||
| − | [[ | + | [[File:Fig4 G a results.png|600x600px]] |
<div id="_heading=h.b8ujfd2fo51m" class="center" style="width: auto; margin-left: auto; margin-right: auto;"> | <div id="_heading=h.b8ujfd2fo51m" class="center" style="width: auto; margin-left: auto; margin-right: auto;"> | ||
| Line 105: | Line 103: | ||
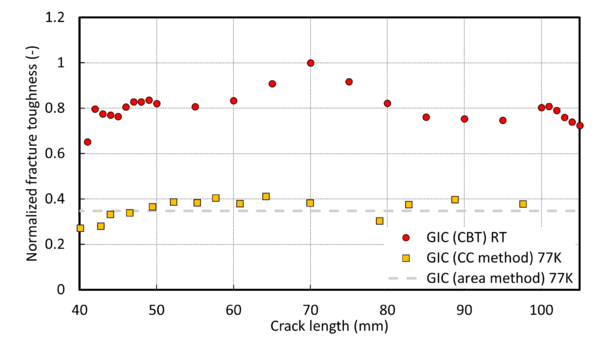
Figure 5 presents the normalized fracture toughness with respect to the maximum G<sub>Ic</sub> (CBT) obtained at RT for a representative specimen tested at 77K. The results show a 60% reduction in the adhesive fracture toughness at cryogenic temperatures. This reduction is in line with the experimental results reported in [1] for a different set of materials. | Figure 5 presents the normalized fracture toughness with respect to the maximum G<sub>Ic</sub> (CBT) obtained at RT for a representative specimen tested at 77K. The results show a 60% reduction in the adhesive fracture toughness at cryogenic temperatures. This reduction is in line with the experimental results reported in [1] for a different set of materials. | ||
| − | [[ | + | [[File:Fig5 G a cryo.png|600x600px]] |
<div id="_heading=h.4x1p7hg4ejnc" class="center" style="width: auto; margin-left: auto; margin-right: auto;"> | <div id="_heading=h.4x1p7hg4ejnc" class="center" style="width: auto; margin-left: auto; margin-right: auto;"> | ||
| Line 112: | Line 110: | ||
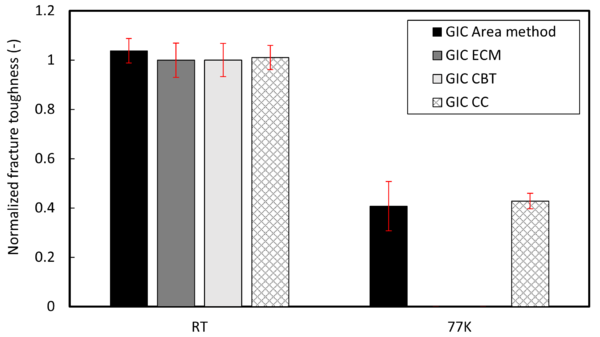
Figure 6 provides a summary of the results, showing the batch average normalized fracture toughness with respect to G<sub>Ic</sub> (CBT) and the coefficient of variation for both RT and 77K measurements. At RT, the area method, ECM, CBT and CC methods are compared. The CC method demonstrates good agreement with the standard methods (ECM and CBT) while exhibiting a small coefficient of variation. At 77K, the CC and the area methods are reported, illustrating the reduction in the adhesive fracture toughness (approximately 60%) and a very small coefficient of variation across the batch tested at cryogenic temperatures. | Figure 6 provides a summary of the results, showing the batch average normalized fracture toughness with respect to G<sub>Ic</sub> (CBT) and the coefficient of variation for both RT and 77K measurements. At RT, the area method, ECM, CBT and CC methods are compared. The CC method demonstrates good agreement with the standard methods (ECM and CBT) while exhibiting a small coefficient of variation. At 77K, the CC and the area methods are reported, illustrating the reduction in the adhesive fracture toughness (approximately 60%) and a very small coefficient of variation across the batch tested at cryogenic temperatures. | ||
| − | [[ | + | [[File:Fig6 G summary.png|600x600px]] |
<div id="_heading=h.ja8fy2sc0zf7" class="center" style="width: auto; margin-left: auto; margin-right: auto;"> | <div id="_heading=h.ja8fy2sc0zf7" class="center" style="width: auto; margin-left: auto; margin-right: auto;"> | ||
Revision as of 10:07, 11 April 2025
1. Introduction
The accurate measurement of interlaminar fracture toughness at cryogenic temperatures is crucial for understanding the performance of composite materials and structural adhesives in extreme environments, such as the in-service conditions found in liquid hydrogen storage tanks. However, standard measurement techniques, such as the Double Cantilever Beam (DCB) test, face significant challenges at cryogenic temperatures. One of the primary difficulties is the inability to directly measure crack length during testing due to the difficult access with an optical system. This limitation arises from the fact that the specimen is inside a cryostat or a dewar flask filled with cryogenic fluid, which is necessary to maintain the required temperature.
Different standards are usually used by industry to determine the mode I fracture toughness. ASTM D5528 and ISO 15024 are meant to characterize the interlaminar failure of composite materials, whereas ISO 25217 covers specifically the characterization of adhesive joints. All the previous standards use similar data reduction methods to calculate the fracture toughness from the tests. All the methods share a common feature: they rely on the measurement of crack length during the test to determine the fracture toughness. Using the methods in the standard, the whole R-curve (i.e. fracture toughness vs crack length) can be determined, which distinguishes between onset and propagation fracture toughness. This information is very relevant in damage tolerance analysis and therefore in structural design.
The area method, on the other hand, does not require the measurement of the crack length during the test, as it calculates the fracture toughness as the total energy dissipated by the fracture process between the initial and final crack lengths. This can be seen as an average value of the fracture toughness during the whole propagation process. However, although this value may be enough for quality control of manufacturing processes, it does not provide information about how the fracture toughness evolves with the crack length and, therefore, is often not considered sufficient to meet industry standards. For that reason, ISO and ASTM standards avoid using the area method calculation.
In this context, the data reduction methods suggested in ISO and ASTM standards are desirable over simpler methods. However, the fact that the crack length is not directly measurable inside a cryostat or a dewar forces the use of indirect methods to estimate the crack length [1]–[3]. This study proposes and validates an alternative methodology for indirectly computing crack length using a compliance calibration method based on previous works in the literature [4], [5]. By establishing a relationship between specimen compliance and crack length at cryogenic temperatures, we eliminate the need for direct optical crack length monitoring during cryogenic testing. This method is applied to bonded joints in carbon/epoxy composites, both at room temperature and at 77K. The room temperature tests are used to evaluate the accuracy of the method by comparing results obtained using both the standard method and the compliance-based approach. Later, the compliance-based approach is used to characterize the fracture toughness at 77K in liquid nitrogen immersion.
2. Experimental method
The materials under study consist of a carbon-fibre epoxy composite substrate bonded with a structural adhesive. The specimens were tested according to ISO 25217 in as-received conditions to determine mode I fracture toughness using a DCB specimen. They were manufactured and inspected in compliance with aeronautical industry standards. Specimens were 25 mm wide, 3 mm thick and 200 mm long. A total of 12 specimens were tested under two conditions: six at room temperature (RT) and six at 77K in a liquid nitrogen immersion bath.
All tests were conducted using a 25 kN Tinius Olssen electromechanical test machine equipped with a 1 kN load cell. A Canon EOS 2000D optical camera with a Sigma EF100 macro lens was used to continuously monitor crack length during testing (only at RT). A custom tooling rig was designed for testing specimens immersed in liquid nitrogen within a commercial dewar flask. This tooling was used for both RT and 77K temperature conditions. The load was applied using side-clamp blocks. The bolt torque of the clamps was carefully selected to accommodate the mismatch in thermal expansion and, at the same time, prevent specimen slippage.
To minimize the influence of the release film, the specimens first underwent a short pre-crack test at a constant crosshead speed of 5 mm/min. All pre-cracking tests were performed at RT. The same crosshead speed was maintained during the fracture propagation tests until the crack reached a length of 110 mm, at which point the test was stopped and unloaded at 25 mm/min, following ISO 25217. The load was continuously recorded as a function of crosshead displacement throughout the test, with a data acquisition frequency of 20 Hz. During RT tests, crack length was continuously monitored, and after the test, the final crack length was measured using a microscope. The images captured during the test were synchronized with force-displacement data, allowing propagation points to be identified through post-processing. Additionally, crosshead displacement was corrected by subtracting system compliance, following the procedure outlined in ISO 25217.
For the cryogenic tests, the specimens were immersed in an LN2 bath at atmospheric pressure using a lifting system with controlled displacement, which was used to cool down the specimens at a controlled temperature rate and prevent thermal shock. Four calibrated Type E thermocouples were used to monitor temperature. The sensors were attached with cryogenic tape at four locations: the top and bottom of the specimen, as well as the top and bottom plates of the tooling rig. An automatic LN2 filling system controlled the maximum and minimum liquid nitrogen levels in the dewar flask. During the cool-down process, the position of the reaction bottom plate could be manually adjusted from the top of the rig to prevent unintended loading on the specimen due to thermal contraction differences between the tooling system and the specimen.
At RT conditions, fracture toughness was calculated using the standard data reduction methods outlined in ISO 25217, namely the Corrected Beam Theory (CBT) and the Experimental Compliance Method (ECM). These standard results were then compared to those obtained using the newly proposed Compliance Calibration (CC) method, as detailed in Section 3. At cryogenic temperatures, fracture toughness was determined using the CC method and the area method.
- 3. Data reduction method
The CC method developed by AMTEC is used to determine the fracture toughness by estimating the crack length indirectly. Assuming beam theory approach, the relationship between the compliance (C) and the crack length (a) is:
|
|
(1) |
where is the crack length correction, is the slope of the curve and N is the loading block correction factor [6]. The specimen compliance can be computed by the measured load applied and the corrected displacement, i.e., , so Linear Elastic Fracture Mechanics (LEFM) applies, and the fracture process zone (FPZ) is assumed to be small compared to the specimen dimensions and crack length. Equation (1) can be experimentally fitted through loading/unloading tests at different known crack lengths without crack propagation. This calibration procedure is done in one specimen per batch. To minimize the number of thermal cycles into the specimen, the following test procedure is used (illustrated in Figure 2 left). The specimen is first tested in LN2 until reaching a sufficient crack extension and unloaded back to zero force. This allows the calculation of the specimen compliance at two known crack lengths ( and ). Then, the specimen is heated up back to RT and a new crack length is set by adjusting the side clamp block. The test is then repeated without crack propagation, applying a maximum load equal to 60% of the measured at the unloading. This procedure is repeated 2-3 times, with effective crack lengths ranging from 40 to 105 mm, which is the propagation range suggested by the standard. As a result, a relationship between the compliance of the specimen and its crack length can be obtained, as shown in Figure 2 right.
Once this relationship is known, the crack length can be indirectly determined as follows:
|
|
(2) |
The Corrected Beam Theory (CBT) method, as defined in the standard, can then be used to calculate fracture toughness as follows:
|
|
(1) |
where is the applied load, is the corrected displacement, is the specimen width and is the large displacement correction factor from Williams [7].
4. Results and discussion
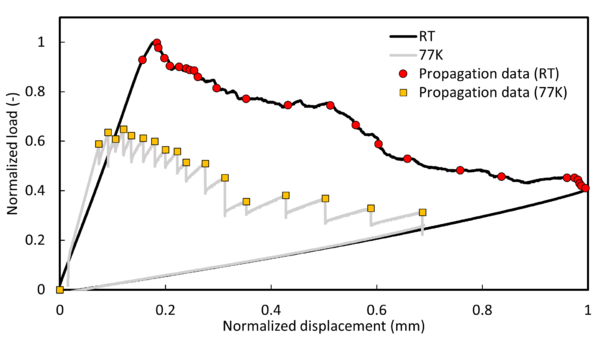
Figure 3 presents the normalized load-displacement curves obtained at RT and 77K for two representative specimens from the batch. The data is normalized with respect to the maximum values recorded at RT. Notably, the specimen tested at 77K exhibits unstable load peaks with stick-slip behaviour. In this case, peak load data points are selected for fracture toughness computation.
Interestingly, fracture surface analysis reveals a shift in the adhesive failure mode, transitioning from a 50% adhesive/cohesive failure at RT to predominantly cohesive failure at 77K.
Figure 4 shows the normalized fracture toughness determined by the standard CBT method, the CC and the area methods for a representative specimen tested at RT. Normalization is done with respect to the maximum GIc obtained using the standard CBT method. The results indicate an excellent agreement between the fracture toughness computed following the two different methods. Notably, similar results were observed across the rest of the specimens in the batch, further validating the CC method.
Figure 5 presents the normalized fracture toughness with respect to the maximum GIc (CBT) obtained at RT for a representative specimen tested at 77K. The results show a 60% reduction in the adhesive fracture toughness at cryogenic temperatures. This reduction is in line with the experimental results reported in [1] for a different set of materials.
Figure 6 provides a summary of the results, showing the batch average normalized fracture toughness with respect to GIc (CBT) and the coefficient of variation for both RT and 77K measurements. At RT, the area method, ECM, CBT and CC methods are compared. The CC method demonstrates good agreement with the standard methods (ECM and CBT) while exhibiting a small coefficient of variation. At 77K, the CC and the area methods are reported, illustrating the reduction in the adhesive fracture toughness (approximately 60%) and a very small coefficient of variation across the batch tested at cryogenic temperatures.
5. Conclusions
This experimental study presents and validates a compliance-based approach for indirectly determining crack length from specimen compliance. This approach is used to apply standard industry methods for the measurement of the fracture toughness of an adhesive at cryogenic temperatures while avoiding the direct measurement of the crack length. The results show excellent agreement compared with standard methods at room temperature, which proves that the proposed approach is a robust, accurate and practical solution for characterizing fracture toughness in cryogenic environments where visual access to the specimen edge is limited. The method not only addresses the challenge associated with direct crack length optical measurement but also preserves standard assumptions and equations. This work contributes to the development of advanced testing protocols and enhances our understanding of the behavior of composite materials and adhesives under cryogenic conditions, supporting their reliable application in liquid hydrogen storage tanks for the next generation of hydrogen-powered aircraft.
Upcoming work will focus on applying the compliance-based method using a similar tooling design in a custom cryostat that cools specimens down to 20K in a helium gas environment at atmospheric pressure.
6. Acknowledgments
The authors would like to acknowledge the financial support from Torres Quevedo programme PTQ2022-012669 funded by MCIN/AEI/10.13039/501100011033.
7. References
[1] R. J. Melcher and W. S. Johnson, “Mode I fracture toughness of an adhesively bonded composite-composite joint in a cryogenic environment,” Compos. Sci. Technol., vol. 67, no. 3–4, pp. 501–506, 2007, doi: 10.1016/j.compscitech.2006.08.026.
[2] Y. Shindo, K. Horiguchi, R. Wang, and H. Kudo, “Double cantilever beam measurement and finite element analysis of cryogenic Mode I interlaminar fracture toughness of glass-cloth/epoxy laminates,” J. Eng. Mater. Technol., vol. 123, no. 2, pp. 191–197, 2001, doi: 10.1115/1.1345527.
[3] M. Hojo et al., “Mode I and II delamination fatigue crack growth behavior of alumina fiber/epoxy laminates in liquid nitrogen,” Int. J. Fatigue, vol. 24, no. 2–4, pp. 109–118, 2002, doi: 10.1016/S0142-1123(01)00065-2.
[4] J. Renart, J. Costa, C. Sarrado, A. Turon, S. Budhe, and A. Rodriguez-Bellido, “Mode I fatigue behaviour and fracture of adhesively-bonded fibre-reinforced polymer (FRP) composite joints for structural repairs.,” in Fatigue and Fracture of Adhesively-bonded Composite Joints., 2015.
[5] J. Renart, S. Budhe, L. Carreras, J. A. Mayugo, and J. Costa, “A new testing device to simultaneously measure the mode I fatigue delamination behavior of a batch of specimens,” Int. J. Fatigue, vol. 116, no. February, pp. 275–283, 2018, doi: 10.1016/j.ijfatigue.2018.06.021.
[6] ISO 25217:2009, “Adhesives - Determination of the mode 1 adhesive fracture energy of structural adhesive joints using double cantilever beam and tapered double cantilever beam specimens.,” Int. Organ. Stand., 2009.
[7] J. G. Williams, “Large displacement and end block effects in the ‘DCB’ Interlaminar Test in modes I and II,” J. Compos. Mater., vol. 21, no. April 1987, pp. 330–347, 1985.
Document information
Accepted on 21/07/25
Submitted on 11/04/25
Licence: Other
Share this document
claim authorship
Are you one of the authors of this document?

